
Studies show that “A well-structured comparison page can increase conversions by up to 54%.” And a conversion-friendly comparison table is one of the core elements that makes it possible.
Most bottom-of-the-funnel visitors rely on comparison tables when comparing products or services. Where a clear table layout helps them understand key differences, consider options, and choose with confidence.
WordPress offers multiple ways to create comparison tables. The most common options include:
- Using the default Table block in the Gutenberg editor.
- Using a dedicated table plugin for advanced customization and control.
You can choose either approach based on your design workflow, need for reusable tables, or customization needs.
In this article, you will learn practical methods to create comparison tables in WordPress, along with guidance on when to use each approach.
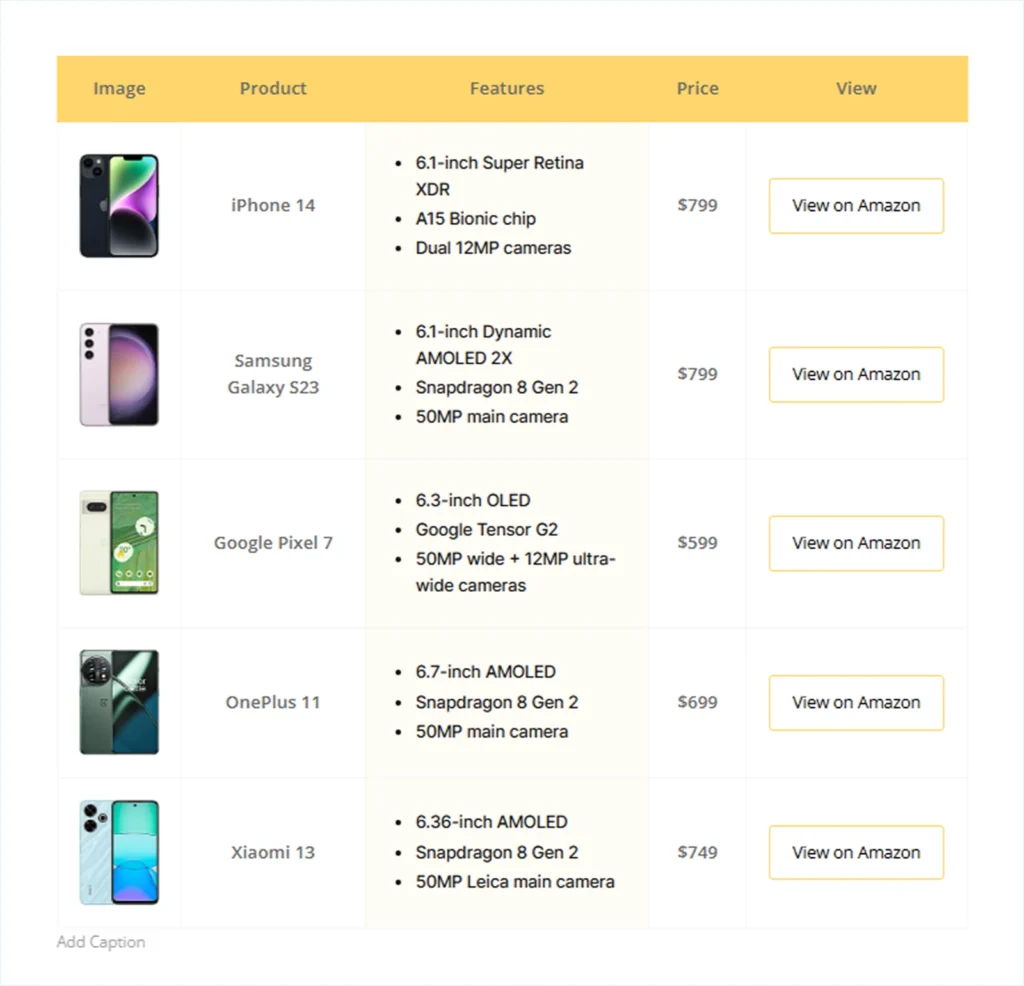
By the end, you will be able to build a fully functional, conversion-focused comparison table like the above within just a few clicks.
Method 1: Create a Comparison Table in WordPress Using the Default Gutenberg Block
In this method, we will build a basic comparison table using the Table block available in the WordPress block editor.
This option works well for simple layouts, but it has some limitations when you need advanced elements and styling control. Here is a step-by-step guide to creating one:
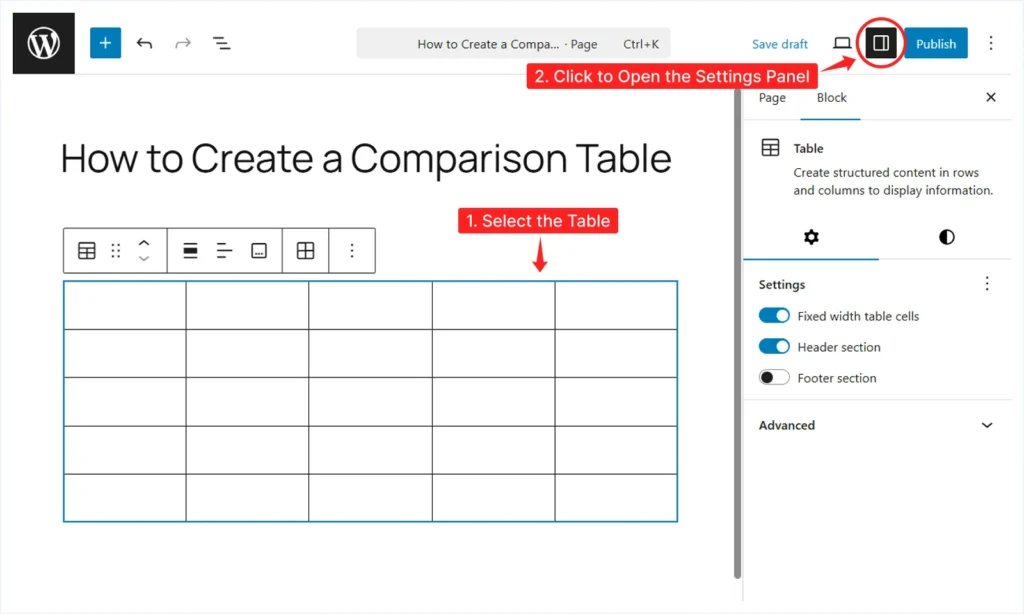
Step 1: Add a Table Block
- Open the Post/Page in the Gutenberg editor.
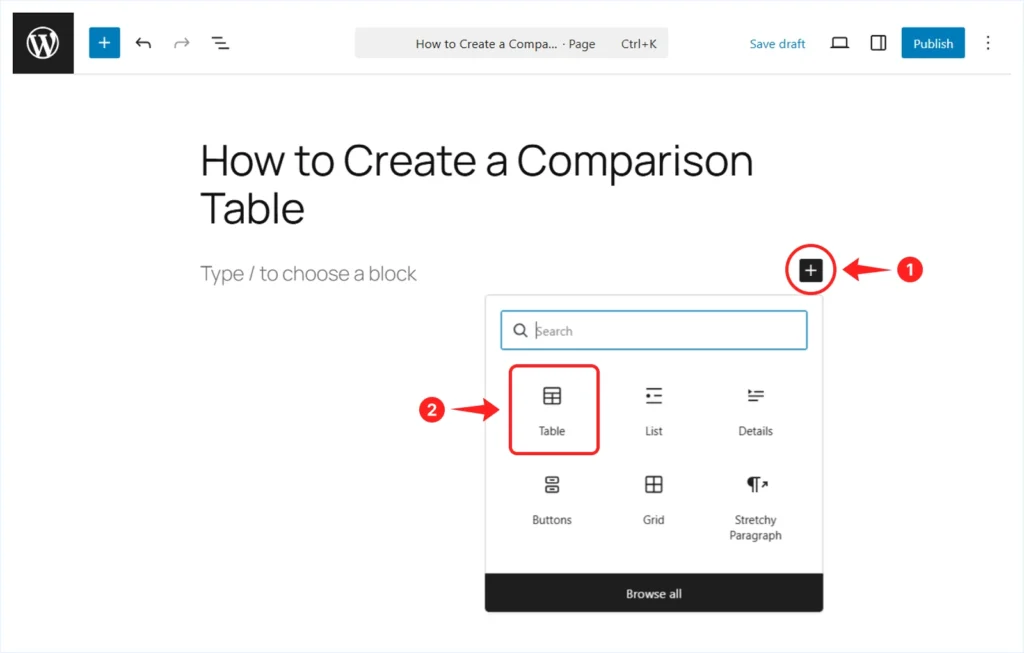
- Click the + Plus icon to add a new block.
- Search for Table and click to insert the block.
Step 2: Define Table Structure
After inserting the Table block, you will see a setup panel where you can choose the number of columns and rows.
For this example, we are using:
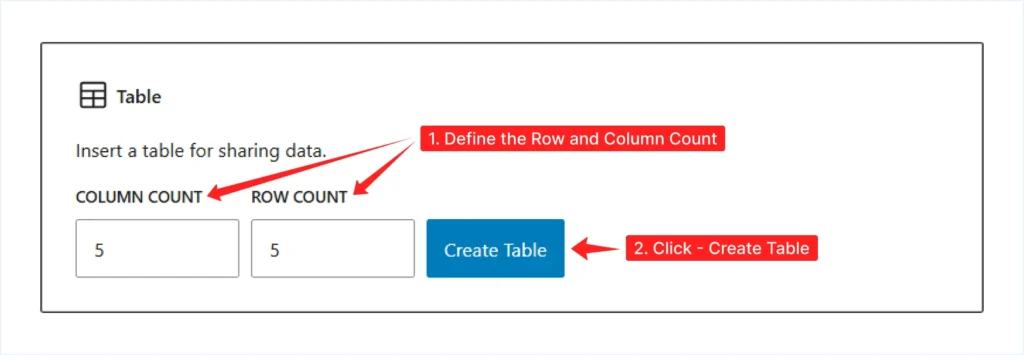
- Column Count: 5
- Row Count: 5
Click Create Table to generate the table.
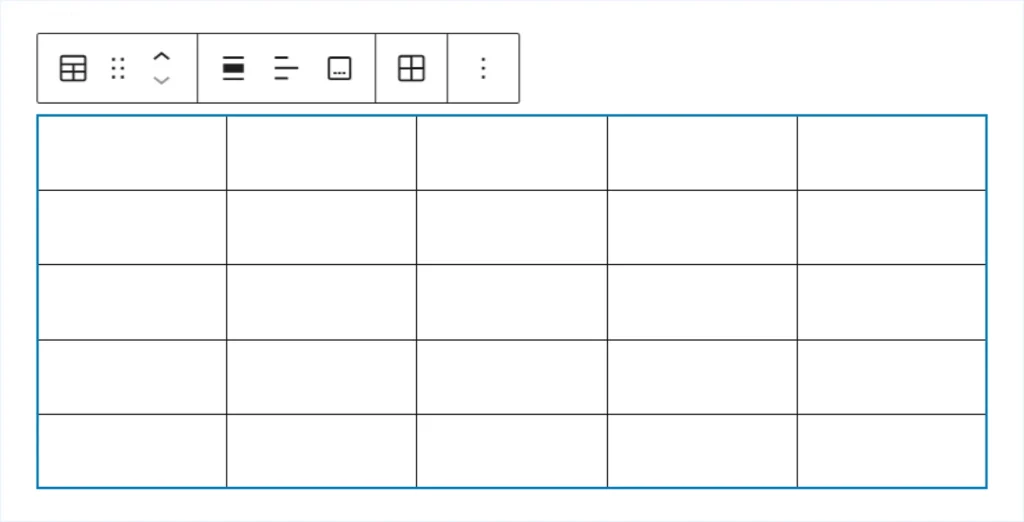
Once the table is created, a blank table canvas will appear based on your selected layout.
Add a Header Row:
- Click anywhere inside the table.
- Open the Settings panel.
- Enable the Header Section toggle from the Settings tab.
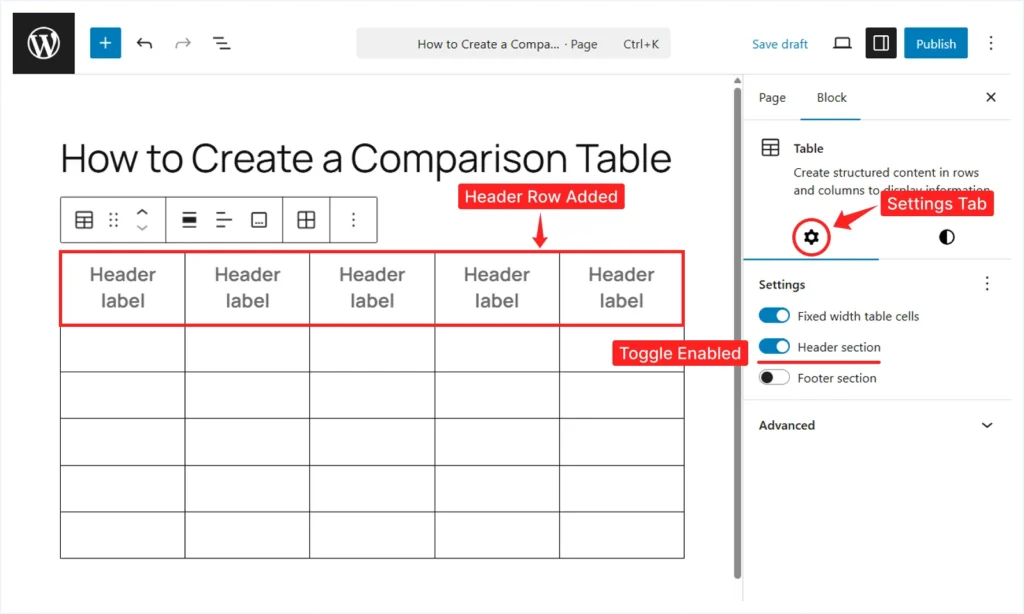
This adds a header row at the top with placeholder text labeled Header label.
Step 3: Add Content to the Comparison Table
Now you can start filling in the table using text, images, and simple calls to action.
Add Text: Click any cell and start typing.
- Add Text to Header Row: Start by adding text to each cell belonging to the header row.
- Add Body Text: Add text to the cells belonging to the Product, Features, and Price column.
Add Image: Let’s insert the product images into the comparison table.
- Click the targeted Cell.
- Expand the Block Toolbar and select Inline Image.
- Now choose your preferred method to upload the image:
- Upload Files: Upload an image file from your computer.
- Media Library: Choose an image from your WordPress media library.
Add Call to Action:
The default Table block does not include a button element. You can still add a simple call to action using linked text. To do this:
- Click the targeted Cell.
- Write the text for the Call to Action.
- Select the text and click Link in the toolbar.
- Paste the URL in the link field.
Add Features Text:
The default Table block doesn’t include a list element. So, the only no-code option left is adding simple text as the product features.
- Click the targeted cells within the features column.
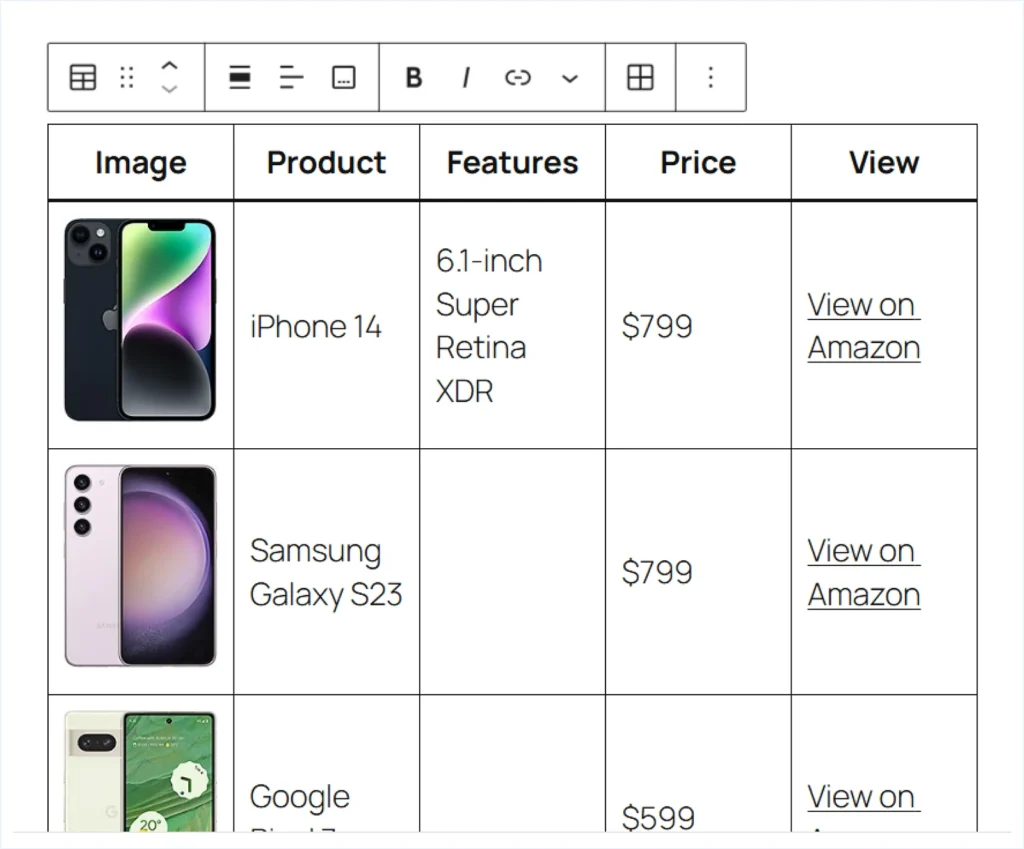
- Start typing to add the product features as text.
Step 4: Style the Entire Table along with the Content
Select the table and open the Settings panel. Under Block Settings, go to the Settings tab. Apply the following changes here:

- Disable Fixed-width table cells so column widths can adjust based on cell content.

It will make your cell’s width flexible, allowing it to adjust automatically based on the content inside the cell.
Now, switch to the Style tab and apply these settings:
- Text Color: Set the text color to Black #111111.
- Background: Set the table background to white #FFFFFF.
- Typography: Open the Typography settings and apply the following changes:
- Font Size: M (Medium)
- Latter Case: Capitalize
- Border Color: Set a Purple (#503AA8) color to the table/cell border.
And that’s it! Your basic comparison table is ready.
However, as you can see, there are several limitations. You don’t get visual elements like buttons or lists, and only a few customization options are available.
If you need more flexibility, you can turn this basic comparison table into an advanced one with just a click.
Required Setup For Doing This:
- The latest version of WordPress is installed.
- RioVizual is installed and activated.
To upgrade your table, click the Table option from the block toolbar and select Transform to → Table Builder.
This transformation unlocks access to 19+ table elements along with a large library of 70+ pre-designed templates. It allows you to enhance your table’s structure, design, and interactivity, helping improve engagement and conversions.
You will also get access to an advanced settings panel with General, Style, and Advanced options, giving you more control over layout and customization.
If you want to explore how RioVizual works in detail, the next section provides a step-by-step guide to creating a comparison table in WordPress using the RioVizual all-in-one table plugin.
Method 2: Create a Comparison Table in WordPress Using RioVizual
Once RioVizual is installed, it gives you two flexible ways to build comparison tables in WordPress. You can choose the approach that best fits your workflow and level of control.
- Use pre-designed templates for faster table creation
- Build from scratch when you need full control over structure and layout
Both approaches work well for affiliate comparisons, product feature breakdowns, and service comparisons.
Let’s start with the quicker option.
Option 1: Create a Comparison Table Using Pre-Designed Templates
RioVizual includes a large library of pre-designed comparison table templates. These templates help you create professional-looking tables without starting from a blank layout.
Follow the steps below to create a comparison table using a pre-designed template.
Here is how you can create one:
Step 1: Create the Table from the RioVizual Dashboard
- Go to WordPress Dashboard → RioVizual → Tables
- Click on Create New Table.
- Enter a table name.
- Enable the Synced toggle if you want global updates across your site.
- Click Create.
- Click the + icon and select Table Builder.
- Select a pre-designed template from the available options.
- Hover over the template you choose and click Import.
Your comparison table is now created. You can edit the structure, update the content, and adjust the styling to match your website. When you are done, click Publish.
If you prefer working directly inside the Gutenberg editor, RioVizual also provides dedicated table blocks. Click the + icon in the editor and search for the RioVizual table blocks to insert them directly.
Step 2: Insert the Comparison Table into any Post/Page:
After creating the table, you can display it on any post or page using a shortcode or a dedicated RioVizual block, widget, module, or element depends on the page builder you are using.
In this example, we are using the WordPress block editor (Gutenberg). The steps are similar for other builders.
- Go to WordPress WordPress Dashboard → RioVizual → Tables.
- Copy the shortcode of the comparison table you created.
- Open the post or page where you want to display the table.
- Click the + icon and search for the Shortcode block.
- Paste the shortcode into the block.
The comparison table will now appear inside your post or page.
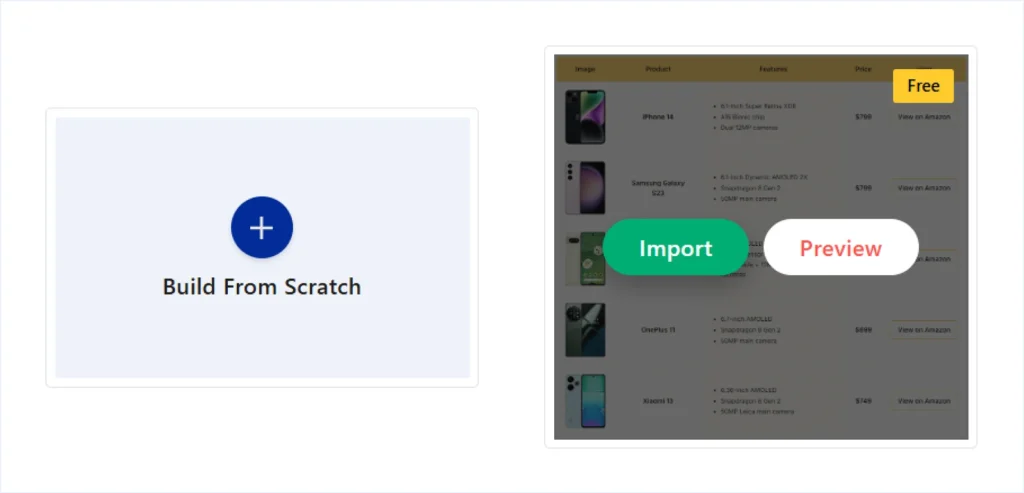
Option 2: Create a Comparison Table from Scratch
If you want full control from the beginning, RioVizual lets you build a comparison table using a blank layout. This method is best when you need a custom structure, specific content placement, or precise styling control.
Below is a step-by-step guide to creating a comparison table from scratch:
Step 1: Create the Table from the RioVizual’s Dashboard
- Go to WordPress Dashboard → RioVizual → Tables.
- Click on Create New Table.
- Enter a table name.
- Enable the Synced toggle if you want global updates across your site.
- Click Create.
- Click the “+” Plus icon and choose Table Builder.
- Select Build from scratch to start with a blank layout.
Note: In this example, we recreate the same comparison table layout used earlier. You can follow the same steps with your own structure, content, and styling.
Step 2: Define the Initial Table Structure
After selecting Build from scratch, a table setup panel will appear. Define the base structure before adding content. You can update these settings later as your design evolves.
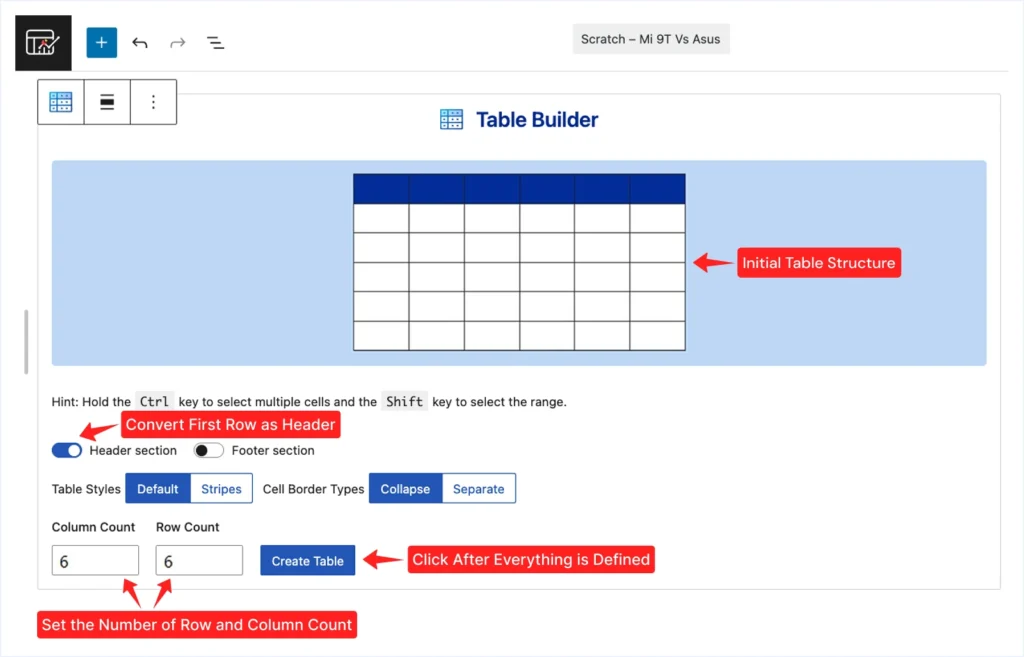
- Header Section: Enable this toggle to convert the first row into a header.
- Footer Section: Left it to the default as our template had no footer.
- Table Style: Select Default.
- Cell Border Types: Use Collapse (default).
- Column Count: Set to 5.
- Row Count: Set to 6.
After the setup is done, click Create Table to generate the table.
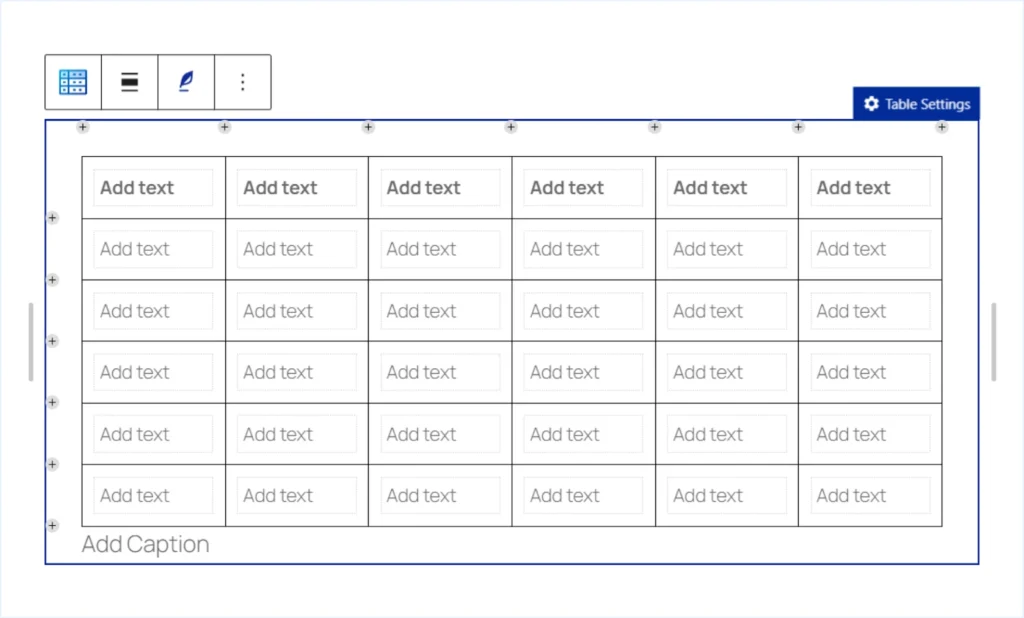
A blank table canvas will now appear based on your selected structure. Each cell includes an “Add Text” placeholder.
Step 3: Add Content to the Comparison Table
Now add the required content to each cell using RioVizual’s elements.
3.1: Add Text – Click any cell containing the Add Text placeholder and start typing.
- Add Text to Header: Begin by adding text to the header row to define each column
- Add Body Text: Add other text content to the body section such as product names, features and pricing
3.2: Add Images – To display the product visually.
- Select the cell where you want to display the image.
- Click the + icon in the bottom-right corner.
- Choose Image from the element list
- Insert the image using one of the following options:
- Upload: Upload an image from your computer.
- Media Library: Choose an image from the WordPress media library.
- Insert from URL: Insert an image directly from the Image URL.
- Go to the Settings Panel → General tab and apply the following:
- Image Width: 100px
- Horizontal Alignment: Center
3.3: Add List – To display the product features.
- Select the targeted cell.
- Click the + icon in the bottom-right corner.
- Choose List from the element list.
- Click each List item placeholder and type your text.
- Go to the Settings panel → General tab to add, duplicate, or remove any list item.
3.4: Add List – Add Buttons:
- Select the cell where you want to display the button.
- Click the “+” Plus icon from the bottom-right corner.
- Choose “Button” from the Element List.
- Update the Button text from the text placeholder or the General tab.
- Add the destination URL for the button.
Once all elements are in place, the table structure is complete. Next, we will style individual elements and the overall table to align with the pre-designed layout used earlier.
Step 4: Style the Table and Its Elements
In this step, we will style the table and its elements to match the pre-designed template used earlier. You can use the same steps to customize the design based on your own preferences.
4.1: Style the Header Row –
- Select the first row using the Row Selector.
- Go to the Settings Panel → Style tab → Cells.
- Open Background Settings.
- Choose Classic to apply a single color background.
- Set the background color to #FFD56C
- Open Border Settings:
- Set the Border Color to #FFD56C
- Open Background Settings.
4.2: Style the Text Element –
- Open the Global Style from the Settings Panel.
- Expand the Text styling section.
- Open Typography settings and apply:
- Font Weight: 600
- Font Size: 16 px
- Open Alignment settings and apply:
- Horizontal Alignment to the Center.
- Horizontal Alignment to the Center.
4.3: Style the List Element –
- Open the Global Style from the Settings Panel.
- Expand the List styling options and apply:
- Gap: 3px vertical distance.
- Color: Text + List Icons #141414.
- Open Typography settings and apply:
- Font Size: 15 px
4.4: Style the Button Element –
- Open the Global Style from the Settings Panel.
- Choose Hover State and open Background Settings and apply:
- Background: Choose Classic and set #FFD56C for the background color when hovering over the button.
- Switch back to the Desktop/Non hover state and Apply:
- Border: Set #FFD56C as the border color.
- Background: No Color
- Color: Set Black #000000 as button text color.
- Open Typography: Apply the following:
- Font Size: 16
- Open Spacing Apply Padding (Inner Spacing) around the buttons:
- Top: 12 px
- Bottom: 12 px
- Left: 20 px
- Right: 20 px
- Open Alignment Settings and set the button alignment to Horizontally Centered.
4.5: Style the Table Cells –
- Open the Global Style from the Settings Panel.
- Expand Cell styling options.
- Open Border settings and apply #F7F7F7 as the cell border.
- Open Spacing Apply Padding (Inner Spacing) around the cells:
- Top: 20px
- Bottom: 20px
- Left: 20px
- Right: 20px
4.6: Style Multiple Cells in the Features Column:
To keep the design consistent with our previously imported template, we are now going to style multiple cells together. To do this, we have to first select those cells and style them together. Here is how you can do this:
- Select Multiple Cells Together:
- Press and hold the Ctrl key.
- Click the first cell in the column.
- While still holding Ctrl, click the last cell in the same column.
- Press the Shift key once to select all cells between them.
- Change the Cell Background:
- Open the Settings Panel → Style tab within the selected.
- Expand Cell styling options.
- Open Background styling and apply the following:
- Select Classic to apply a solid single color background.
- Choose #FFFCF5 as the background color.
That’s it. Your comparison table is now ready. You have recreated the same layout used earlier and can insert the table into any post or page using the same insertion method shown before.
Which Method Should You Apply?
In this guide, we covered the practical ways to create a comparison table in WordPress. Each method works well, but the right choice depends on how much design control you need and how much time and effort you are willing to invest.
If your requirement is a simple comparison table with basic styling, the default Gutenberg Table block is sufficient.
However, if you want to take your tables further with advanced elements, reusable table layouts, and centralized management from a single dashboard, a dedicated table plugin like RioVizual is a better fit.
Our Recommendations:
- Use an all-in-one table plugin like RioVizual to create any type of comparison table.
- Start with RioVizual’s pre-designed templates to save time and maintain design consistency.
- Build tables from scratch when you need full control over structure, content placement, and styling.
Closing Thaught
A comparison table plays a key role in terms of user engagement and overall conversion. And it should be scalable and easily manageable from a single dashboard if you work with a lot of comparison table data.
In today’s fast-moving digital environment, creating a conversion-focused comparison table in WordPress should take only a few clicks. This not only saves time but also makes your workflow more scalable as your website grows.
If you want to explore more options, this guide on Best WordPress Table Plugins will help you compare features and choose the right solution.
If you face any issues while following this tutorial, or if you learned something useful from it, feel free to leave a comment. We always enjoy hearing your feedback.

Leave a comment