
When you make changes to your WordPress website, like updating text or adding new content, it’s exciting to see those changes go live. But sometimes, they just don’t show up like they should. Frustrating, right?
Don’t worry, you’re not alone! Many WordPress users face the same frustrating issue: “WordPress Changes Not Showing.” It’s like your website is playing hide-and-seek with your updates. But the good news is that we’ve got your back!
In this blog post, we’ll break down this problem step by step. We’ll explain why it happens and show you exactly how to fix it. So, get ready with your computer and follow this tutorial to solve the issue with ease!
Common Reasons Behind “WordPress Changes Not Showing” Issue
There are a few common reasons behind this WordPress changes not showing issue. In this segment, let’s discuss some of them:
- Caching Issues: Your website might be holding onto old versions of your site. Caching is like a temporary storage for your site, and sometimes, it doesn’t refresh automatically.
- Theme-Related Problems: Your WordPress theme controls how your site looks. If there’s a glitch or a conflict with your theme, it can prevent changes from appearing.
- CSS or JavaScript Errors: If there’s a mistake in your website’s code, it can stop changes from showing.
- Browser Cache: Sometimes, your web browser holds onto old data. That makes it look like your site hasn’t been updated. It’s like your browser is showing you a saved version of a webpage instead of a fresh one.
- CDN Caching: Content Delivery Networks (CDNs) help speed up your site by storing copies of it on servers worldwide. But if your CDN cache isn’t refreshed, changes won’t show up everywhere.
- Hosting-Related Issues: Your web hosting provider plays a role too. If their servers have problems or outdated settings, your changes might not appear.
These are the usual suspects when it comes to the “WordPress Changes Not Showing” mystery. In the next sections, we’ll show you how to tackle each of these issues so you can get your changes to finally display on your website
3 Ways to Fix the WordPress Changes Not Showing Issue: Step-by-Step Guide for You
After hitting the save or update button while editing anything on your WordPress site if the changes are not shown immediately that means there is something wrong in your site.
It’s like redecorating your room and then wondering why the new paint color isn’t on the walls.
To address that problem, here we are sharing 3 ways for you:
- Clear Your Browser Cache
- Clear Your WordPress Site Cache
- Clear the CDN Cache
Now let’s describe each of the above-mentioned points in details so that you can easily understand what your should do to tackle the WordPress change not showing issue.
Step 01: Clear Your Browser Cache
Imagine your web browser is like a treasure chest where it stores pieces of websites you’ve visited before. It’s handy because it helps those websites load faster the next time you visit.
But sometimes, it can get a little too enthusiastic and hold onto old stuff, making your new website changes seem invisible.
To fix this situation, you can force refresh your browser to download the latest version of all files from your website’s server.
There are different ways to do so on your WordPress site, depending on your browser and operating system:
- Google Chrome: Press Ctrl + F5 on Windows and Command + Shift + R on macOS.
- Mozilla Firefox: Either Ctrl + F5 or Ctrl + Shift + R on Windows, and Command + Shift + R on macOS.
- Safari: Press Option + Command + E on macOS.
- Microsoft Edge: Press Ctrl + F5 on Windows and Command + Shift + R on macOS.
If for any unknown reason, your shortcut doesn’t work, you can follow this manual process:
a) Google Chrome
- First, click the three dots in the top-right corner (customize and control).
- Then go to More tools -> Clear browsing data.
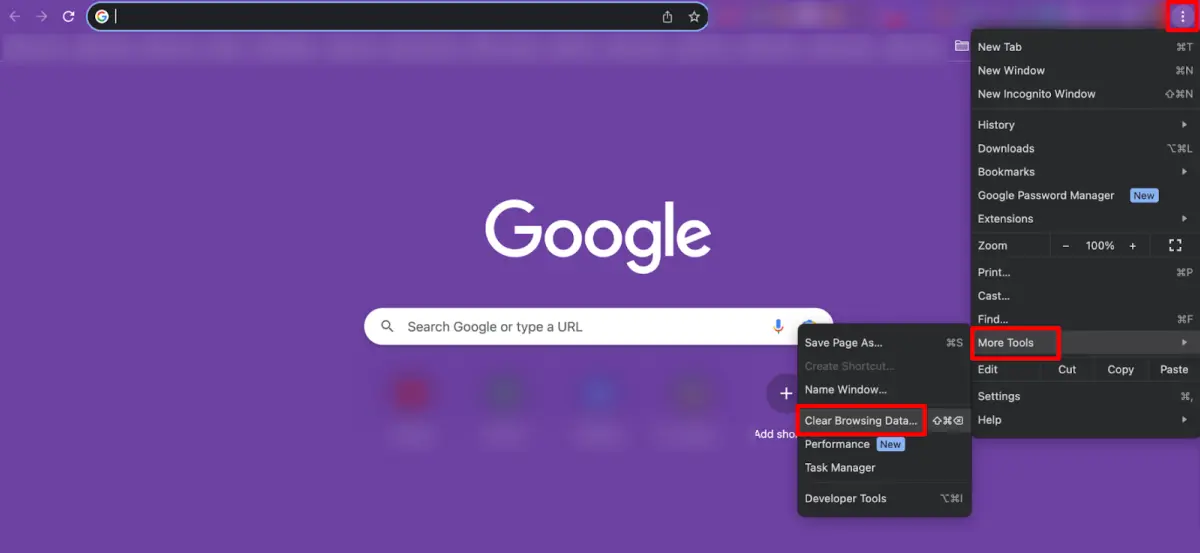
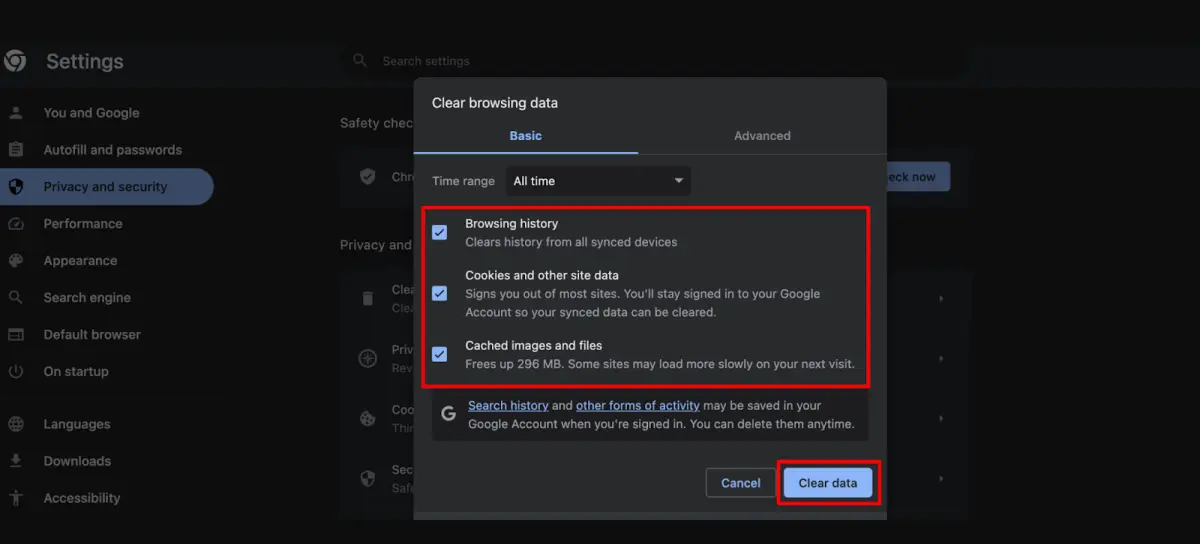
- Finally, choose “Browsing history, Cookies and other site data, and Cached images and files” and click the Clear data.
That’s all!
b) Mozilla Firefox
- Click the three horizontal lines in the top-right corner (open menu).
- Go to “Options” -> “Privacy & Security.”
- Scroll down to “Cookies and Site Data” and click “Clear Data.”
c) Safari (on Mac)
- In the menu bar, click “Safari” -> “Preferences.”
- Go to the “Privacy” tab.
- Click “Manage Website Data” and then “Remove All.”
d) Microsoft Edge
- Click the three dots in the top-right corner (more).
- Go to “Settings” -> “Privacy, search, and services.”
- Under “Clear browsing data,” choose “Choose what to clear.”
Once you’ve done this, your browser will forget about the old version of your website and will fetch the fresh one. It’s like cleaning your glasses to see things more clearly. After clearing your browser cache, check your WordPress site again, and you should see those changes you’ve been missing.
Step 02: Clear Your WordPress Site Cache
Clearing the cache on your WordPress site is a necessary step if you want to ensure that your website displays the most up-to-date content and changes.
Caching can help improve website performance by storing static versions of your pages, but sometimes, it can cause your site to show outdated information.
Let’s check how you can clear your WordPress site cache:
If you are using a caching plugin like WP Super Cache, Autoptimize, or W3 Total Cache, the process to clear the cache is almost similar for every plugin. For this tutorial, we are going to show you how you can clear your site cache using the WP Super Cache Plugin and w3 Total Cache Plugin.
Clear Your Site Cache Using the WP Super Cache
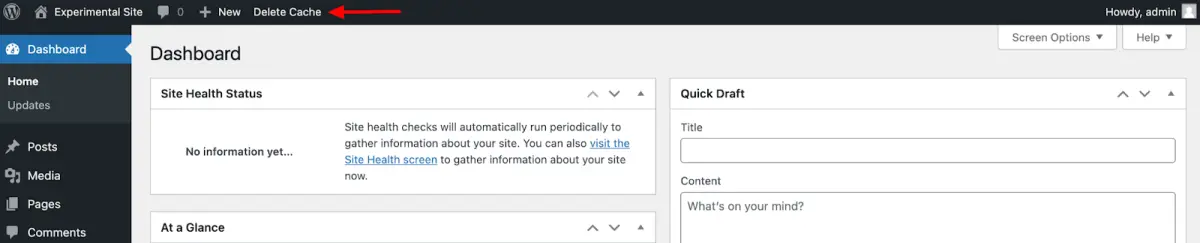
Log in to your WordPress dashboard and then find the “Delete Cache” button. You can clear your site cache by simply hitting this button.
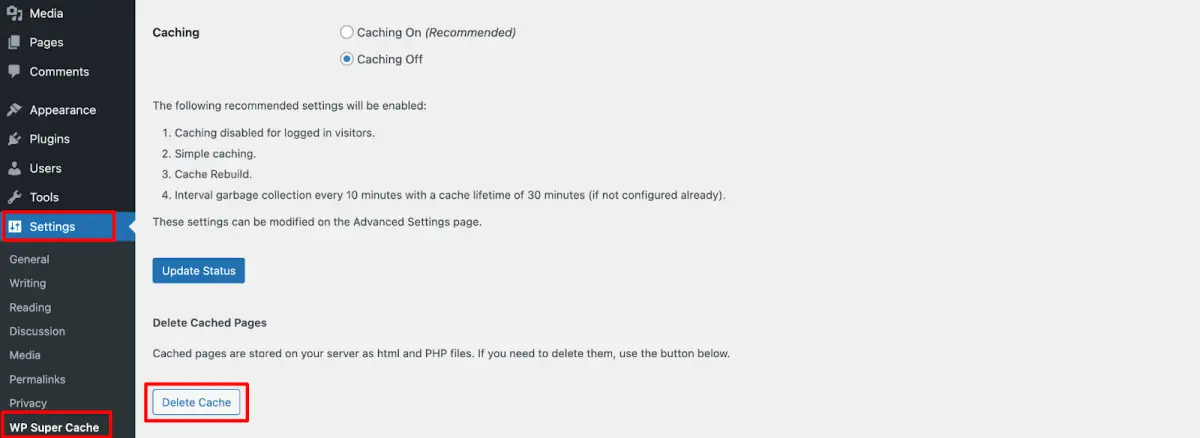
There is another way to delete your site cache. Go to your WordPress dashboard -> Settings -> WP Super Cache and click on the Delete Cache button.
To check if the “WordPress Changes Not Showing” issue has disappeared, open your site using a different tab. If you already have it open, try doing a hard refresh instead.
To prevent this issue from happening again, set a timeout for the WordPress plugin to clear the cached content accordingly. To do so, go to your WordPress dashboard -> Settings -> WP Super Cache -> Advanced.
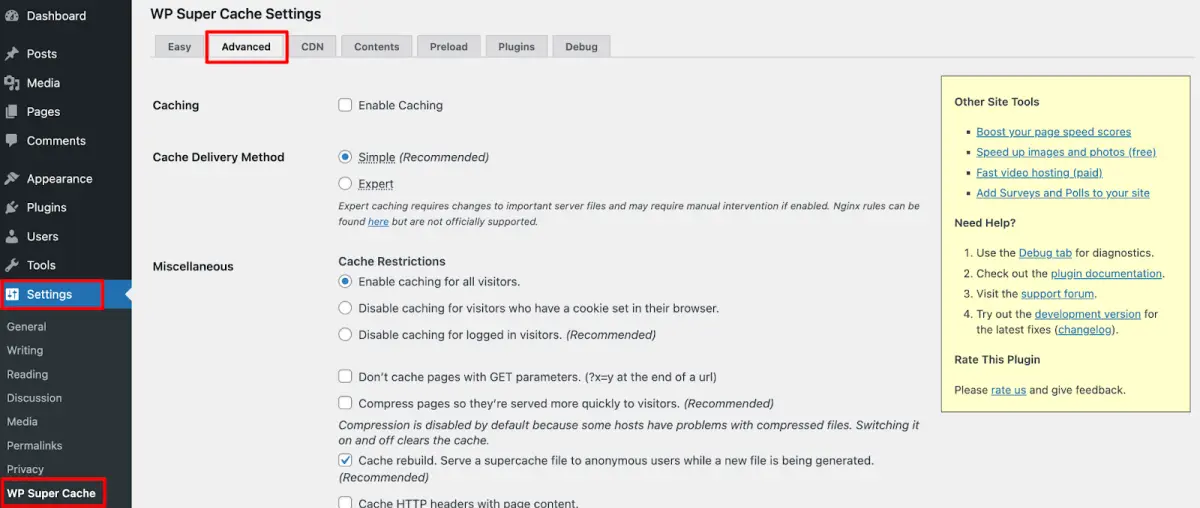
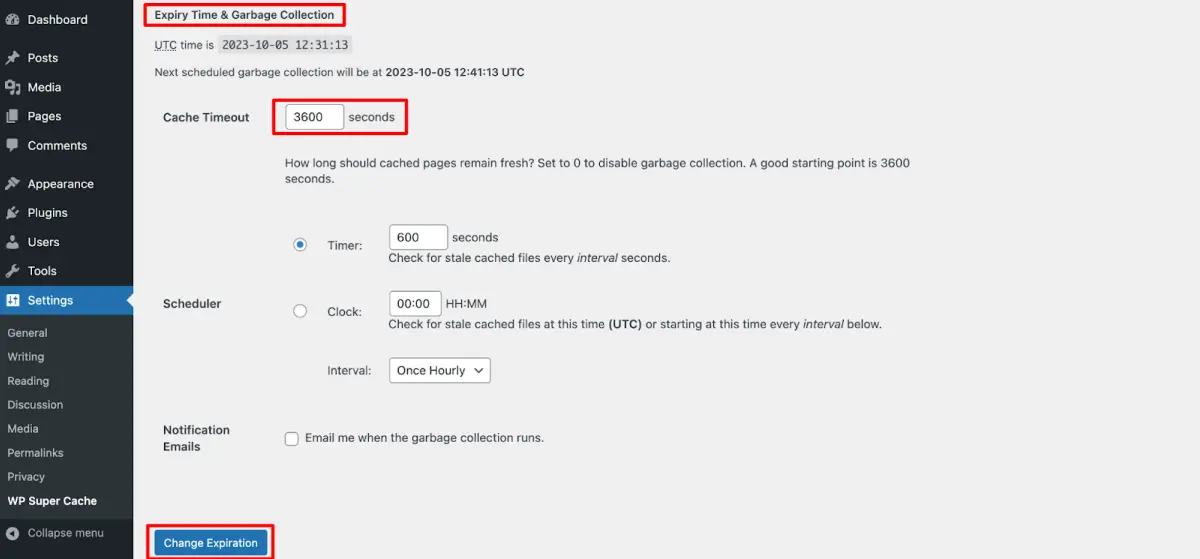
Scroll to the Expiry Time & Garbage Collection, and set the Cache Timeout accordingly. You can set it to 3600 if you have a regular site. However, if you are getting a high traffic you should set it to 1800. Finally, click Change Expiration to finalize the process.
Clear Your Site Cache Using the W3 Total Cache
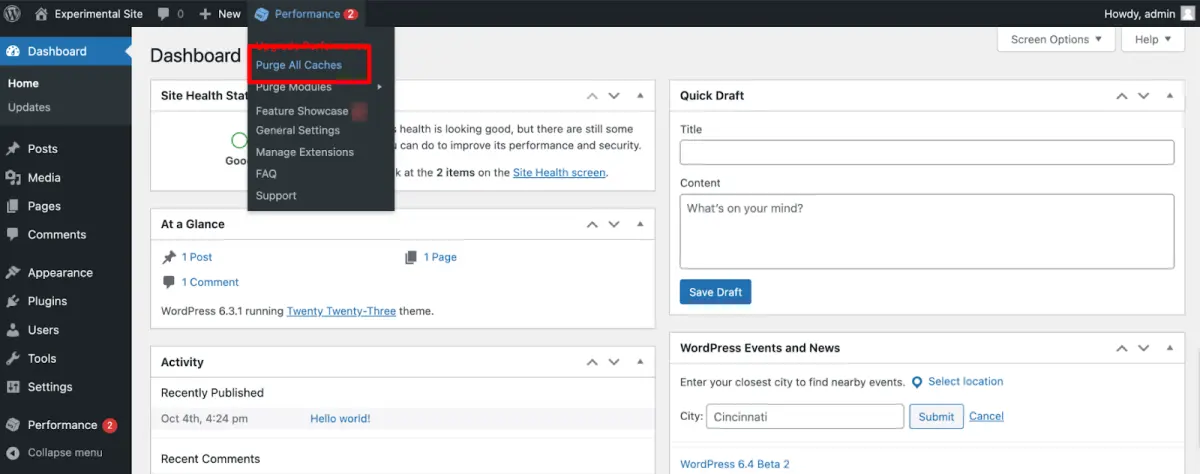
The process of clearing the site cache using the W3 Total Cache is simple. Just head to your WordPress dashboard and you will find the “Performance” option on the WordPress toolbar.
Hover over the “Performance” and you will find the “Purge All Caches” option. To clear all your site cache, simply click on the Purge All Cache option.
That’s all!
To enable or disable the plugin configurations, such as page, minify, opcode, and database cache, head to General Settings and click the option you prefer.
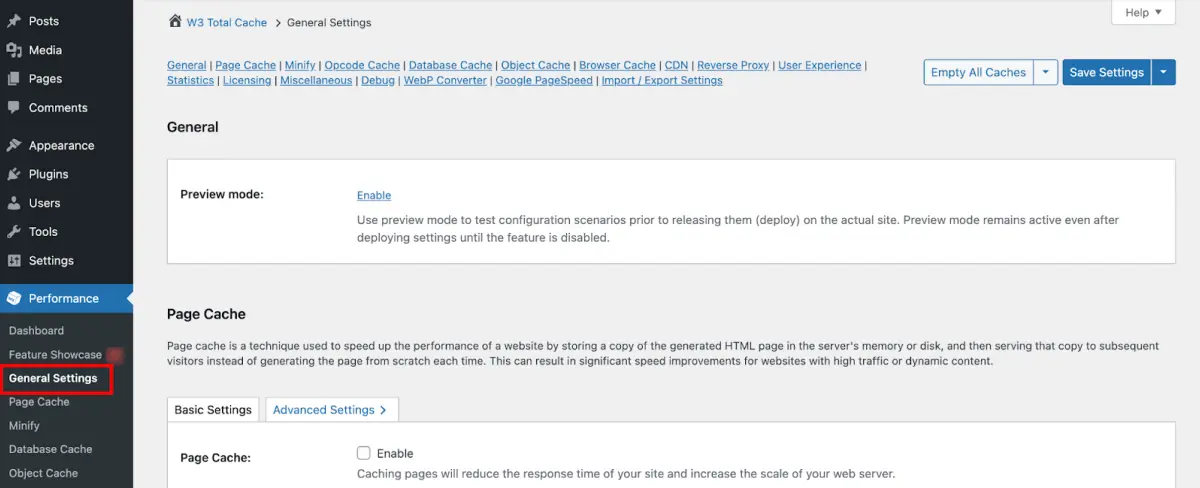
After making your changes, you can select either “Save all settings” to save the changes only, or “Save Settings & Purge Caches” to not only save the changes but also erase the historical data.
Step 03: Clear the CDN Cache
If you use a Content Delivery Network (CDN) such as MaxCDN or Cloudflare, it’s possible that even after you’ve cleared your browser and site caches, the CDN cache might still be serving an outdated version of your website.
CDNs store copies of your site on servers around the world to make it load faster for visitors, but sometimes these cached copies need time to update with the latest changes you’ve made to your website.
Let’s check how to clear your CDN cache:
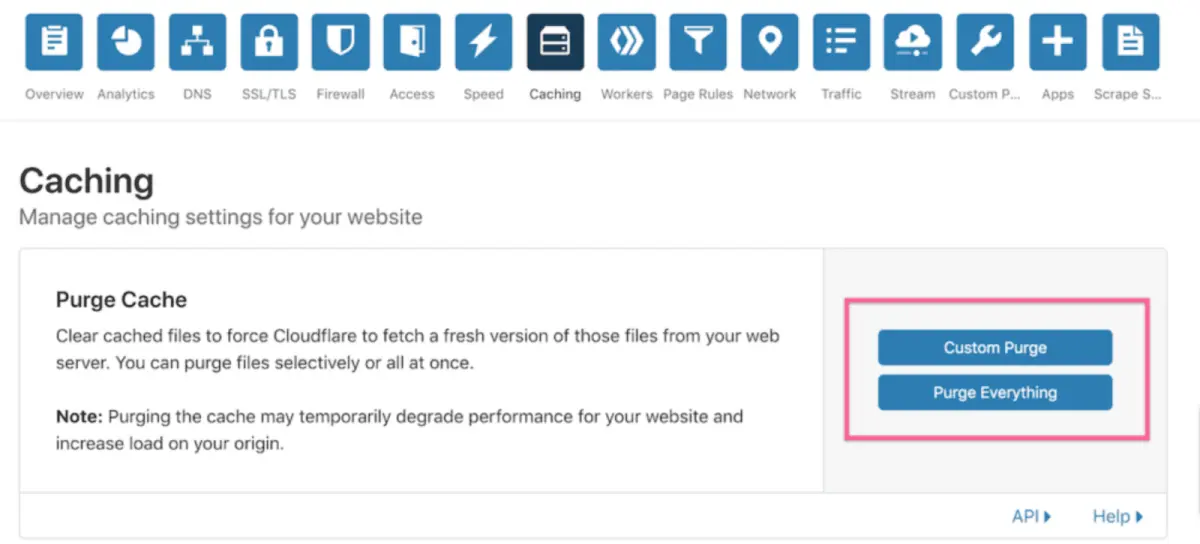
Different WordPress CDNs have different methods for clearing the cache. For instance, with Cloudflare, you have two options to clear the cache. To begin, log in to your Cloudflare account and navigate to Caching -> Configuration.
There are two options to clear your CDN cache. If you want to clear cache for a specific we page, you should click on the “Custom Purge” and insert the URL to clear cache for that specific page.
And if you want to clear the cache for your whole site, you should go for the “Purge Everything” option.
There is another way to clear the CDN cache and that is to disable your CDN service. After making all these changes, you should check your site to see if the WordPress updates not showing issue has vanished or not.
Bonus: 5 Expert Tips to Avoid the “WordPress Changes Not Showing” Issue in the Future
To avoid the “WordPress Changes Not Showing” issue in the future, here are the top five practices to follow:
- Clear Caches Regularly: Make it a habit to clear both your browser cache and any caching mechanisms on your website, such as caching plugins or Content Delivery Networks (CDNs), after making updates to your site. This ensures that visitors see the most recent changes.
- Use a Reliable Caching Plugin: Install a reputable caching plugin like W3 Total Cache, WP Super Cache, or Autoptimize to manage and optimize your site’s caching settings. Configure the plugin correctly to avoid caching conflicts.
- Test Changes on a Staging Site: Before applying significant updates or changes to your live site, test them on a staging or development environment. This allows you to identify and resolve issues without affecting your live website.
- Use a Version Control: Consider using version control systems like Git to manage your website’s code. This way, you can track changes, roll back if necessary, and ensure that updates are deployed smoothly.
- Check for Plugin Compatibility: When adding new plugins or updating existing ones, verify their compatibility with your current WordPress version and other plugins. Incompatible plugins can lead to conflicts that prevent changes from displaying properly.
By following these practices, you can minimize the likelihood of encountering the “WordPress Changes Not Showing” issue and maintain a more reliable and consistent website experience for your visitors.
How to Fix WordPress Website Not Loading Issue- A Quick Recap for You
Facing “WordPress Changes Not Showing” is really disappointing, specially when you are making any important changes to your site. However, we have shared a few proven tricks in this blog so that you can confidently address this issue without hiring any expert.
We have also shared a few best practices to avoid this WordPress changes not updating issue. By following these best practices, you’re not just resolving the problem, you’re proactively safeguarding your website’s performance and user experience.
If you have any questions or need further assistance, don’t hesitate to reach out. Our comment box is always open for you.

Leave a comment