
So, you’ve decided to start your journey as an affiliate marketer, and now it’s time to create your affiliate website.
There are ways to create affiliate websites for Free! And many beginners fall into these traps. And the result? The short-term savings almost invariably backfire.

Beginners who create their affiliate website for Free!
If you are serious about creating a professional affiliate website on a few bucks, then continue reading this article.
In this article, I will show you a step-by-step guide on how to create your first affiliate website that generates revenue.
Step 1: Choose Your Niche
Every successful affiliate marketing website starts with one crucial decision, which is niche selection. Think of your niche as the foundation of your affiliate business.
What is a niche?
In affiliate marketing, a niche is a specific segment of a larger market that has unique needs, interests, and preferences. Instead of trying to cover everything, you focus on one area and become a trusted source in that space.
For example, if your broad niche is Technology, possible micro-niches could be:
- Artificial Intelligence (AI)
- Blockchain
- App Development
You can even narrow it further to target a more specific audience, like:
- AI Agent for Small Business
- Blockchain Technology for Fintech
- App development with Python
By narrowing your niche, you can determine the topic your content revolves around, the audience you serve, including their needs, pain points, and buying behavior.
It also helps you to stand out, rank, and gain authority faster than choosing a broad niche.
Here’s how to choose your niche wisely
- Passion + Knowledge: Choose a niche where you are already an expert or have a genuine interest. It will make your content creation enjoyable and keep you consistent in the long run.

- Validate Market Demand: Use your marketing brain and utilize tools like Google Trends, Ahrefs, or SEMrush to analyze whether people are genuinely interested in your niche and actively searching for the products you are going to promote. Also, try to understand the signal if the demand is rising or falling.
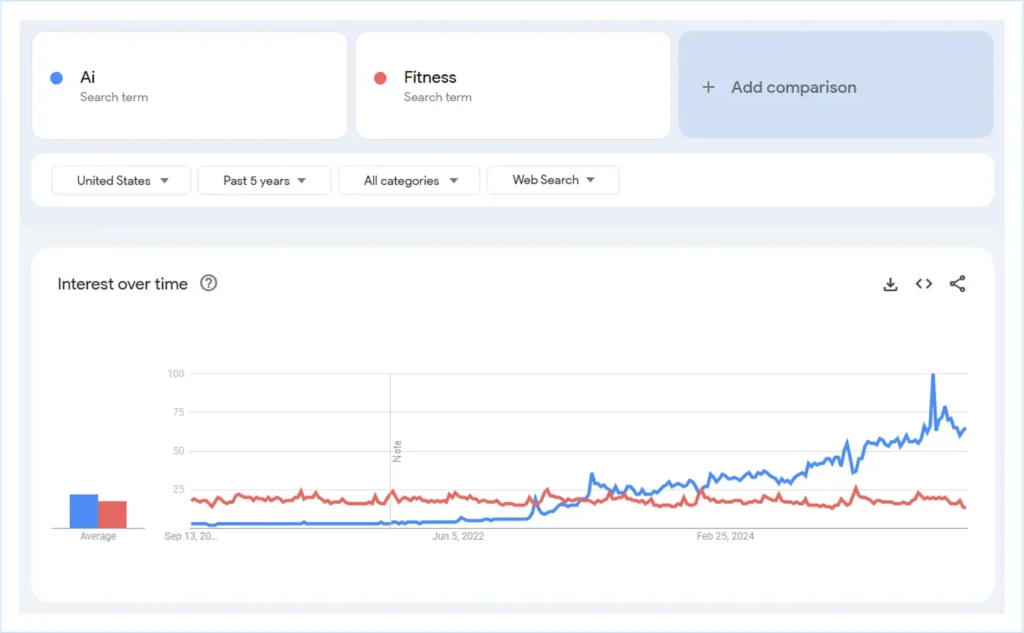
Trending analytics of AI and Fitness on Google Trends (Past 5 years in the US)
- Monetization Potential: Passion alone won’t pay the bills. Research whether any affiliate program is available in your niche, and the audience you selected is ready to spend money. If so, check if they are offering decent commissions and recurring payouts.

Pro Tips: Before committing, brainstorm at least 15-20 content ideas in your niche. If you can’t, it may not be the right one for yours. Always try to stick with a niche where the products are proven and solve a real problem.
Step 2: Choose Your Website Type
Once you have locked your niche, the next step is to decide what types of affiliate websites you’ll build. The website structure you choose will help you shape your content strategy and earning model.
A smart way to start is by researching existing affiliate websites in your niche. See what’s already working, identify the gaps, and note which models dominate the space.
Conducting a competitor analysis will inspire you and help you choose the path that best fits your goal. Learn more about the Affiliate Marketing Website Examples.
To help you decide, we have compiled the most common types of affiliate marketing websites along with the examples here:
1. Blog and Content Site
This is the most popular and beginner-friendly type of affiliate website. You publish helpful articles, tutorials, and guides related to your niche, naturally including affiliate links within your content.
Example: Wirecutter (owned by The New York Times)
Website Type: Blog
Niche: Product reviews for fashion, household items, gadgets, and electronics

2. Review and Comparison Site
This type of website focuses on detailed product reviews, such as top-10 lists and side-by-side comparisons. Readers who visit these sites are usually close to making a purchase, so conversion rates are often very high.
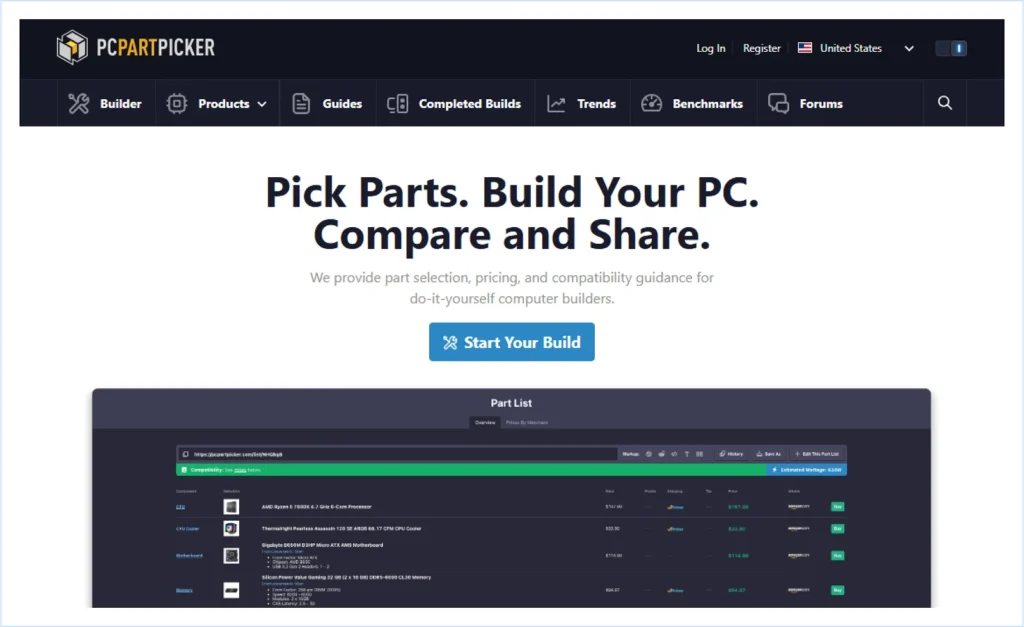
Example: PcPartsPicker
Website Type: Product Review and Comparison
Niche: PC hardware reviews, build guides, and benchmarking
3. Coupon and Loyalty Site
These sites attract bargain hunters by listing promo codes, deals, and discounts. Some also offer cashback or loyalty points from their own affiliate commission to encourage repeat visits.
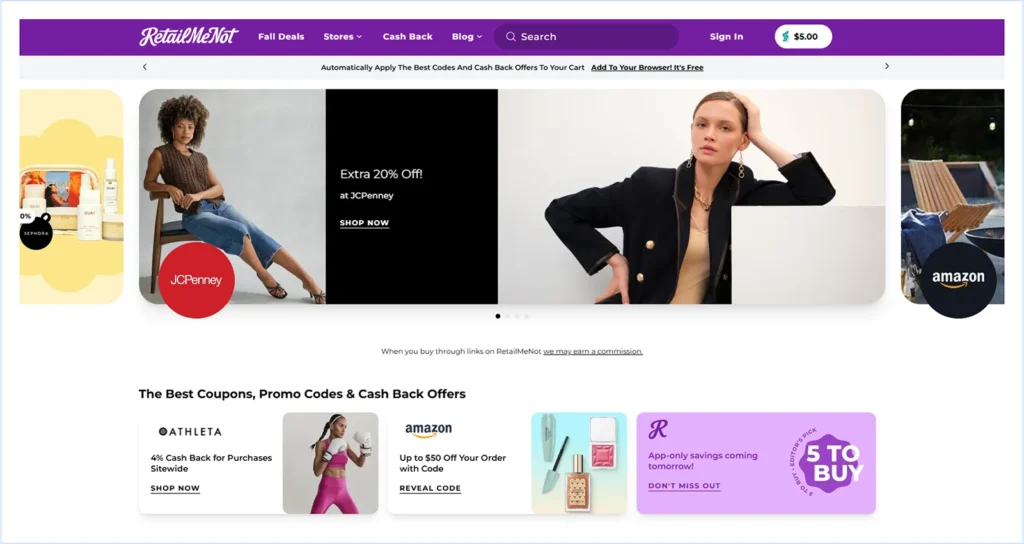
Example: RetailMeNot
Website Type: Coupon & Deals
Niche: Online shopping discounts across fashion, electronics, travel, and more
4. Large Web Properties (Authority Sites)
These are comprehensive websites designed to dominate an entire niche. They often include a mix of blog content, guides, tools, reviews, and resources. Building an authority site takes more time, but it can become a long-term, sustainable brand.
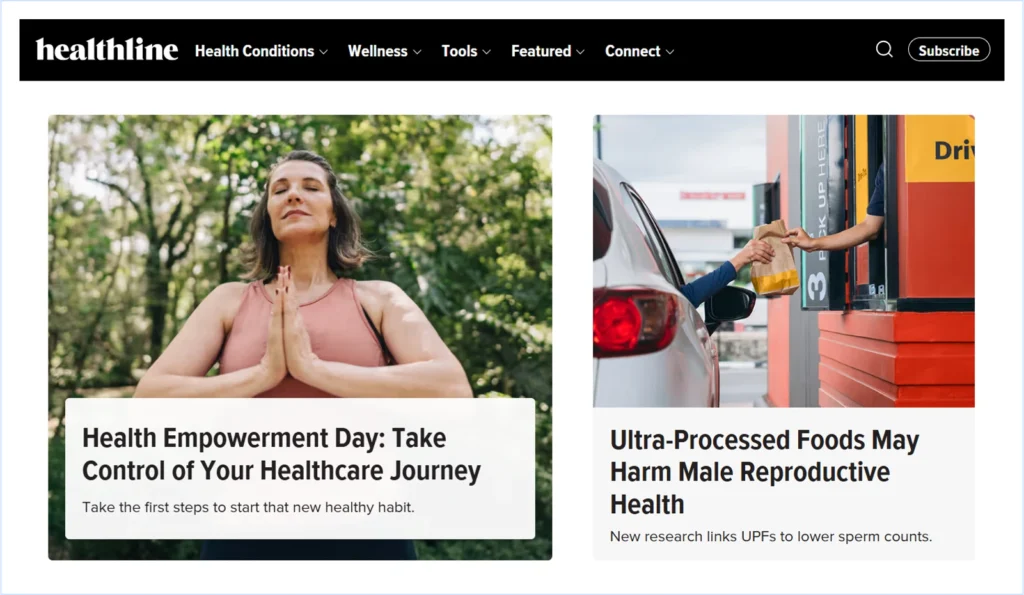
Example: Healthline
Website Type: Authority Site
Niche: Health, wellness, and fitness guides with affiliate product promotions
5. Hybrid Sites:
Hybrid sites combine elements of multiple models, such as blogs, reviews, comparison tables, tools, and even coupon sections. It captures the visitors at every stage of their buying journey.
Example: NerdWallet
Website Type: Hybrid (Content + Review + Comparison + Tools)
Niche: Personal finance, banking, credit cards, and investing tools

Pro Tips: If you’re a beginner and a solopreneur, consider starting with a blog and content site. It’s the simplest way to grow with SEO, offering flexibility to expand into reviews, comparisons, or even hybrid models later.
Step 3: Choose a platform to build your website
Your niche and website are locked. And now it’s time to choose a platform to build your affiliate website. There are many ways to create one.
But we can simplify the options into two main categories:
Option 1. Using Custom Code
This involves building a website from scratch using HTML, CSS, JavaScript, or frameworks such as React, Next.js, and others.
Building and managing a custom-coded website gives you complete control over design and performance. At the same time, it’s time-consuming, requires strong programming skills, and can be expensive if you hire developers.
Still, it might be best for you if you are a developer or have the budget to hire one to create and manage your website.
28.7% of the world’s websites use custom code to create their website. Source: W3Techs
Option 2. Using a CMS (Content Management System)
CMS is a beginner-friendly software that lets you build and manage complex websites without touching any code.
It comes with features like themes, plugins, and a drag-and-drop builder to create any complex website. And it can be the best way to create a website if you are a non-programmer, a beginner, or a marketer seeking flexibility, affordability, and speed.
Here are the most popular CMS for creating websites:

Source: W3Techs
WordPress dominates the CMS space, with 60.7% market share for creating websites.
43.3% of the websites available on the internet are built with WordPress. Source: W3Techs
In fact, the site you are reading this article on is built on WordPress.
And this CMS covers all, from creating small blogs to large authority sites.
We will use WordPress in the guide to create the affiliate marketing website. You can use any of those CMS according to your preference.
Why WordPress?

There is a good reason for choosing WordPress over other CMS.
Which are:
- Ease of use: WordPress is a beginner-friendly solution that doesn’t require technical knowledge to set up and manage websites.
- Customization: Thousands of plugins and themes are available, allowing you to create and customize any website, from blogs to complex websites.
- Community Support: With millions of users worldwide, the community support is stronger than others, offering many forums and tutorials.
- Affordable Pricing: WordPress itself is a free and open-source platform. You only have to pay for the domain and hosting to set up. And it only costs you if you use a premium theme and plugins from the thousands of free options available.
- Scalability: Whether you’re starting a simple niche blog or planning to grow into a hybrid authority site, your WordPress website will grow with you.
Step 4: Get a Domain and Hosting
We have chosen the niche, website structure, and platform to create our website. Now it’s time to give our website a digital home, which requires a domain name and hosting.

Think of your domain as the street address and house number on the internet, and hosting as the land where the website (house) sits.
How to Choose the Right Domain Name:
Finding the right domain is tricky, especially when 763 million domains are already registered worldwide.
“Nearly one domain for every 10 people on the earth.“
Let’s walk through the following steps to find the right one for yours:
- Keep it short & simple: Aim for 2-3 words max while choosing the domain name. Short domains are easier to type, remember, and share. For example, fitwithai.com is better than fitwithartificialintelligence.com.
- Reflect your Niche: Make sure the domain you choose reflects what your site is about. If your niche is home workouts, something like homeworkoutlab.com works better than a random name.
Pro Tips: Utilize the tools like Lean Domain Search and Namcheap Domain Name Generator to find available domains in your niche. Hosting providers like Bluehost and Hostinger offer a one-year FREE domain registration for a single domain when you purchase the hosting plan from them.
How to Choose the Right Hosting Plan:
Your hosting directly affects website speed, security, and uptime, which influence your SEO and conversions. Choosing the wrong hosting provider can slow down your site and even hurt your ranking.
Here is what to look for while choosing hosting:
- Understand the different hosting types: Learn about various hosting types and the facilities, such as Shared Hosting, VPS, Managed WordPress Hosting, and Cloud Hosting. Then choose one that better suits your goal and budget.
- Learn about the Server Location: Look for a hosting provider that allows you to host your site in the nearest location to your targeted audience. The closer your server is, the faster your website’s loading speed will be.
- Migration and Customer Support: Choose a hosting provider that offers 24/7 live support via chat or call and provides seamless hosting migration support in the future.
Pro Tips: Settled with a multi-site Managed WordPress Hosting plan from a reliable provider like Bluehost or Hostinger, which offers automated backup, free SSL certificate, multiple server locations, SSD/NVMe storage, and competitive pricing with migration support.
Step 5: Install WordPress from your hosting’s cPanel
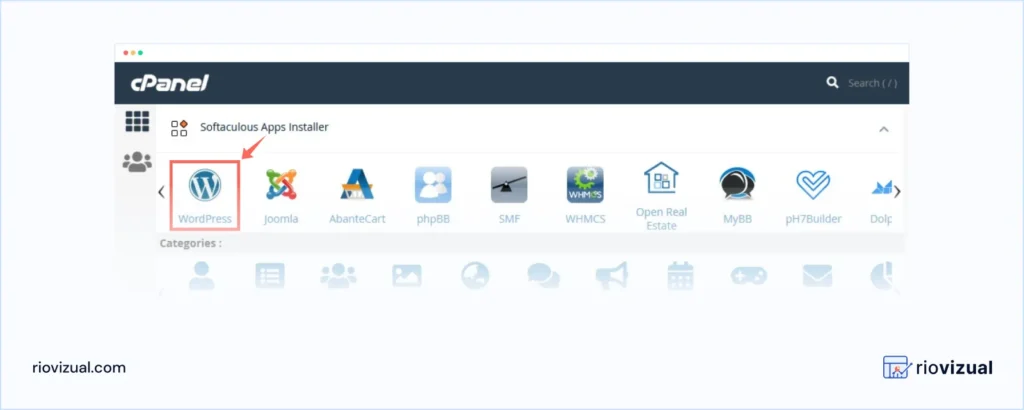
We have secured our domain and hosting. Now it’s time to install WordPress. If you have already chosen a managed WordPress hosting, you will find it installed by default.
We can also install it from the hosting’s cPanel (Control Panel).
Choosing different companies for domain registration and hosting would require an extra step, whereas selecting the same company would reduce the steps.
Let’s explore how you can install WordPress within both setups:
Method 1: Seme Domain Registrar and Hosting Provider:
- Log in to your hosting dashboard (cPanel).
- Look for the WordPress installer or CMS installer option.
- Select the domain name you have registered with the same provider.
- Fill your site details (site title, admin username/email, and password)
- Click Install WordPress and wait a few minutes.
- Once installed, you can log into your website’s backend at: yourdomain.com/wp-admin
Method 2: Different Domain Registrar and Hosting Provider:
- Log in to your domain register account.
- Look for the Manage domain option and find the DNS or Nameservers settings.
- Replace the existing nameservers with the ones provided by your hosting provider. (Example: ns1.hostingprovider.com and ns2.hostingprovider.com)
- Save your changes.
- Once done, log in to your hosting’s cPanel and look for the WordPress Installer.
- Install WordPress as we described in the previous section.
- Once installed, you can log into your website’s backend at: yourdomain.com/wp-admin
Once done, it may take 24-48 hours for DNS propagation.
Pro tip: Setting up with the same company for both Domain Register and Hosting Provider will save you time and money.
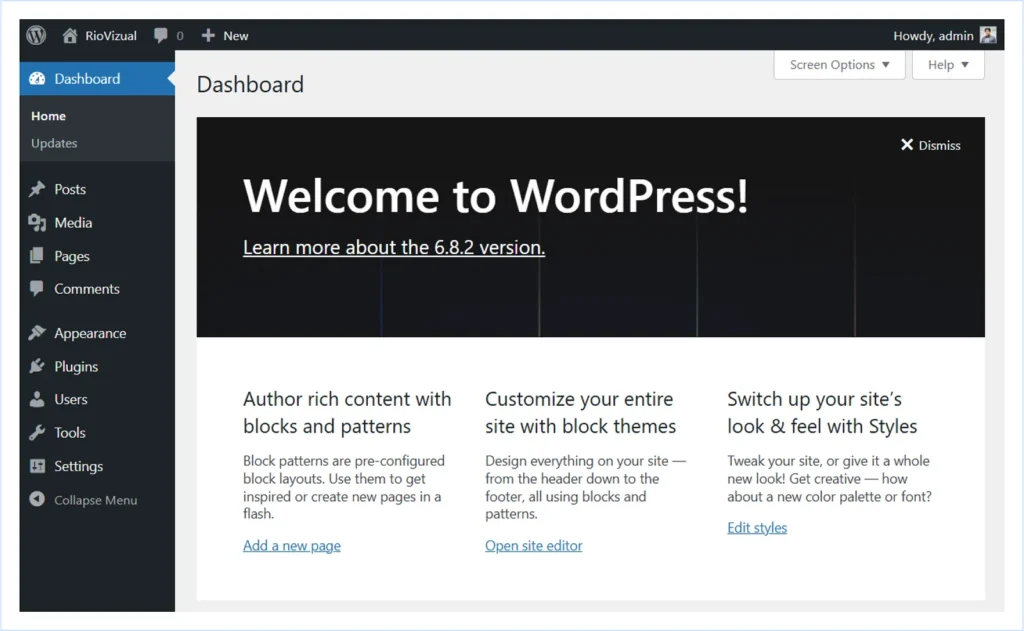
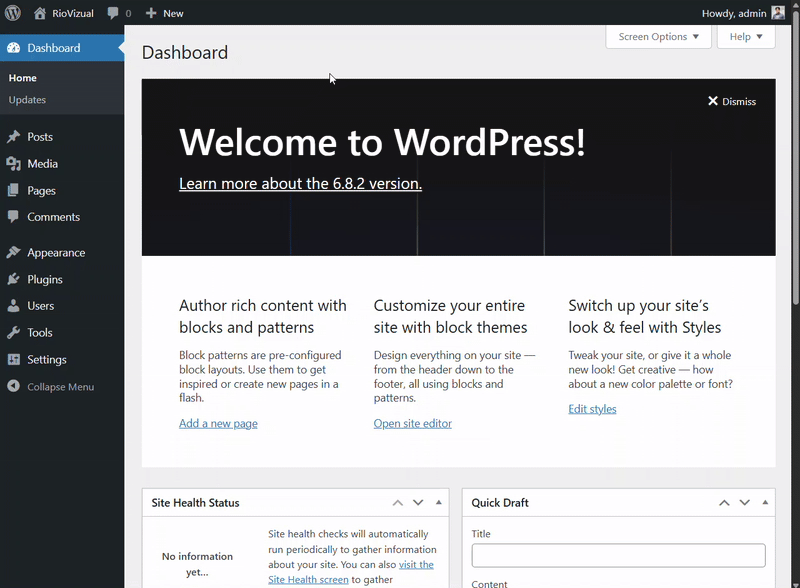
Step 6: Customize your WordPress Website:
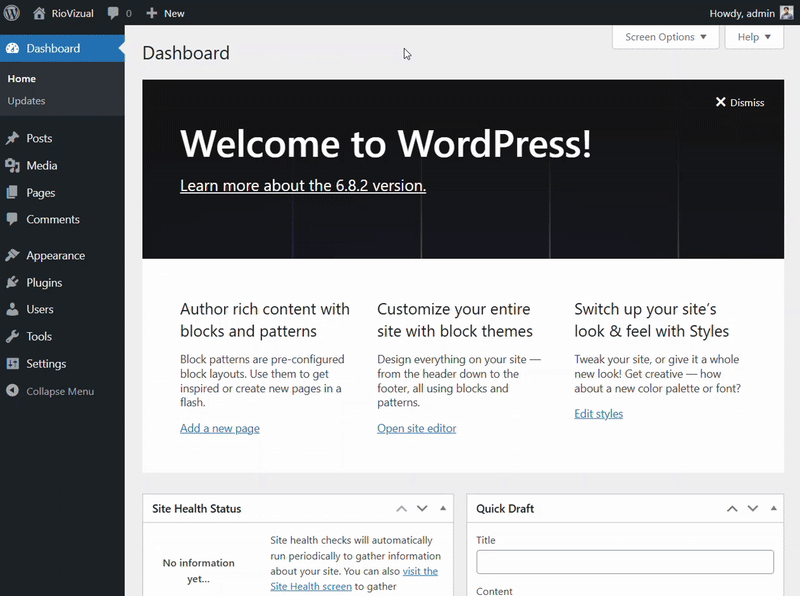
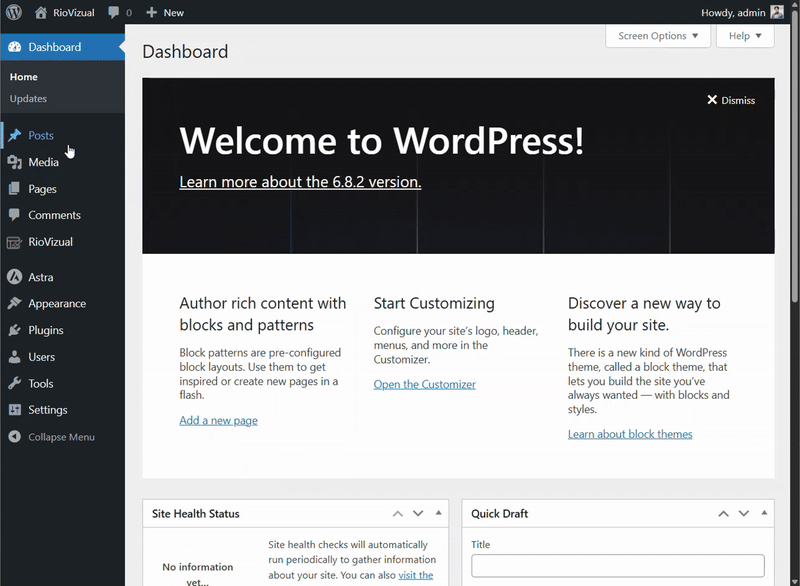
Once you have installed WordPress and logged in to our website backend, using yourdomain.com/wp-admin, WordPress will welcome you like this.
And it will look like this by default in the front. You can view your website’s public version by browsing your root domain or by hovering over Site Title → Visit Site.
It doesn’t look that professional. Right? We will customize it now to give it a professional look.
6.1. Customize Basic WordPress Settings:
Go to your WordPress dashboard by browsing: www.yourdomain.com/wp-admin. Do the following customization from Settings:
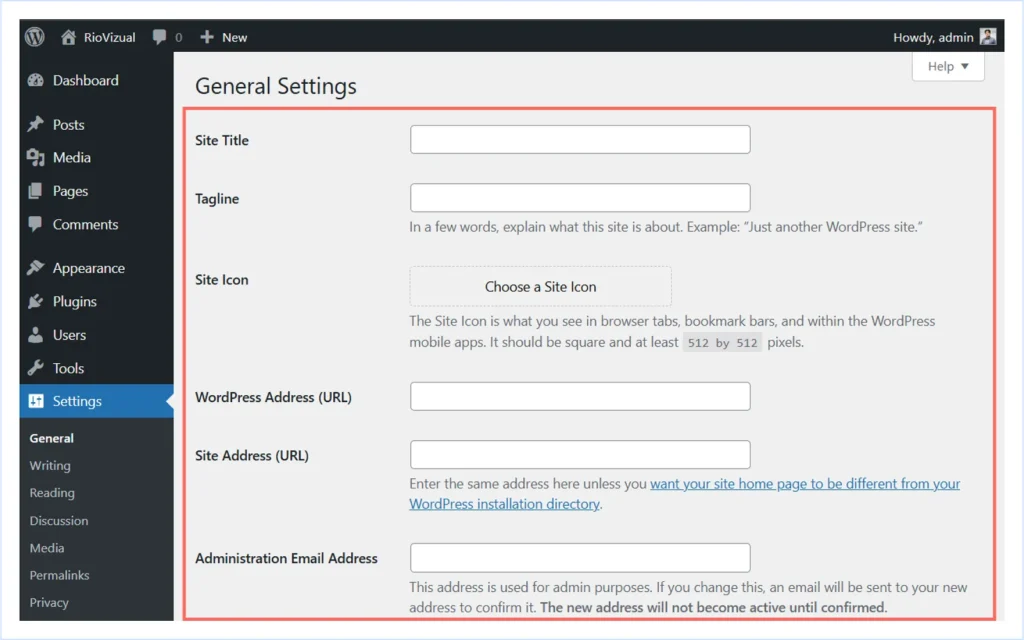
- Click to Settings → General.
- Update Site Title, Tagline, Site Icon (Favicon).

- Choose your Site Language, and set Timezone, Date, and Time Format that match your audience and save the changes.
- Click Settings → Permalinks → Select Post name for clean, SEO-friendly URL.
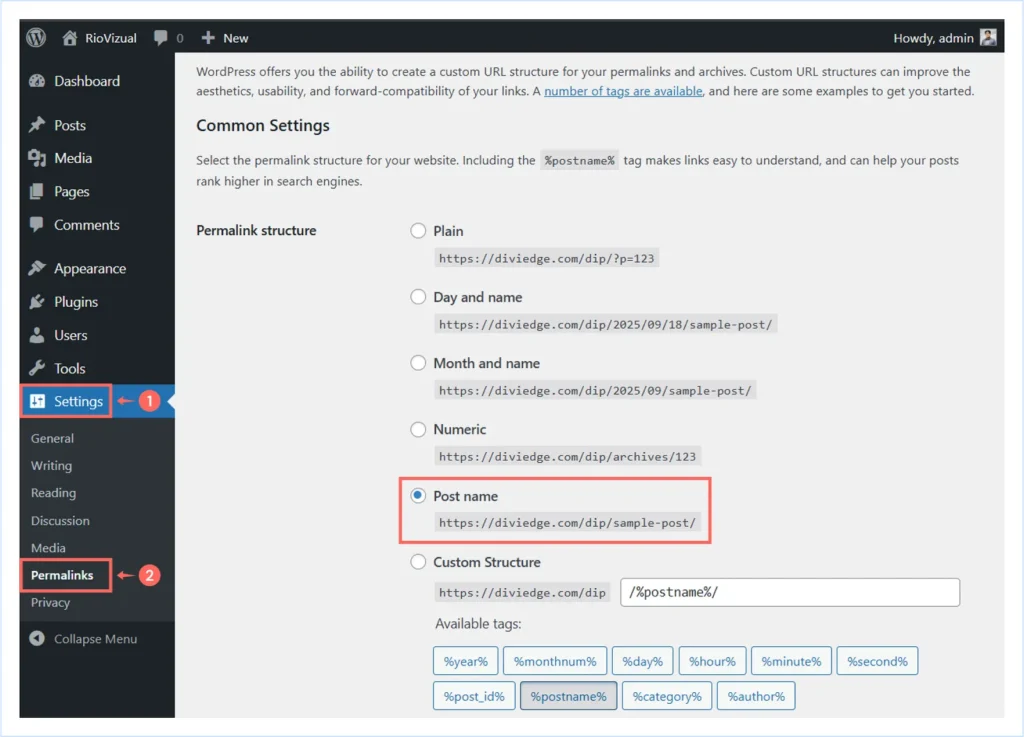
And that’s it for now. Our basic settings are complete for now. We can customize according to our preference later.
6.2. Install and Customize Theme:
After customizing these default settings, it’s time to start designing the website. The WordPress ecosystem is blessed with many renowned themes for creating websites.
In this article, we are going to share one of the most popular themes, Astra (Free Version), from the WordPress theme directory. However, you can use any theme according to your preference.
Let’s start with installing the theme:
- Go to your WordPress Dashboard → Appearance → Themes.
- Click Add Theme to add a new theme to your website.
- Search by the theme name in the Search box or choose one from the categories.
- We have chosen Astra and clicked the Install button.
- Click to activate after the theme has been installed.
The theme we installed has been activated, adding a new feature to the Dashboard.
However, you can also purchase any premium WordPress theme from marketplaces or the company’s website. Almost all the time, you will get a zip file after buying one. You can also upload the zip file and activate the theme.
6.3. Customize Theme:
After installing a theme, your site’s design will update to the theme’s default look. But it still won’t feel unique or aligned with your brand. Now it’s time to customize the theme and give your website a professional appearance.
Follow these steps to do this:
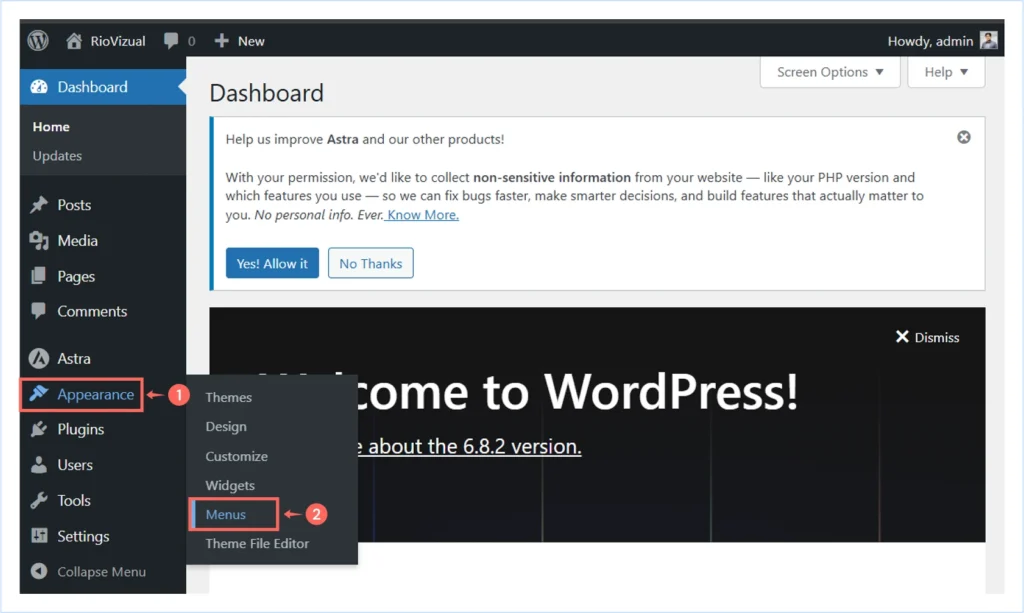
- Go to your WordPress Dashboard → Appearance → Customize
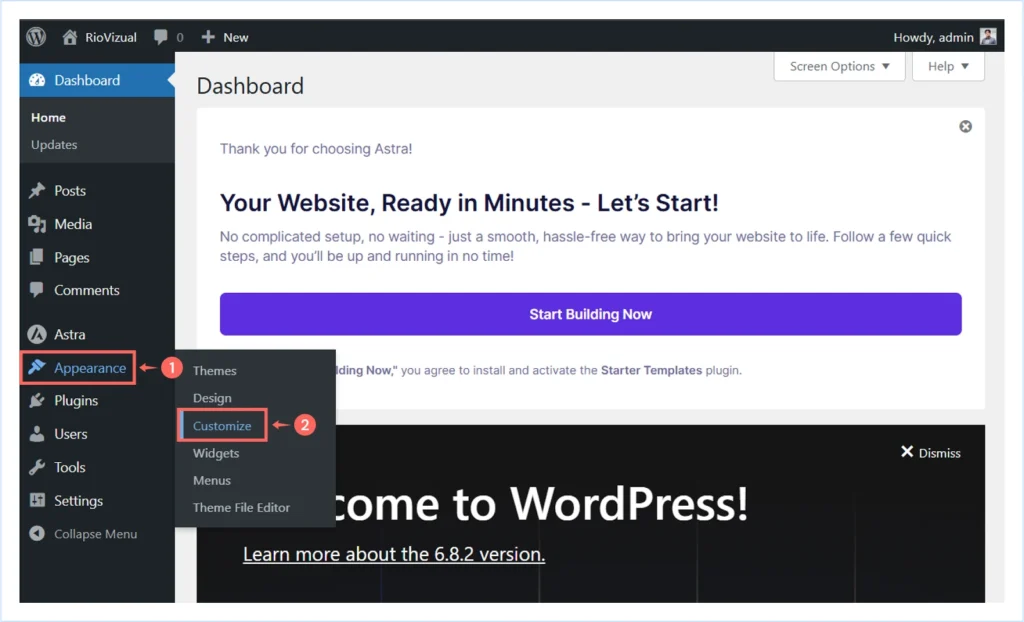
The WordPress Theme Customizer will open with a live preview of your site on the right and customization options on the left. From here, you can adjust the key parts of your site:

- Global Settings: Customize the fonts, colors, spacing, and button styles across your whole website. You can set it according to your brand style.
- Header: Customize your header layout, add your logo, and set up your navigation menu.
- Footer: Add copyright text, quick links (Privacy Policy, Contact), and social icons.
- Post Type: Customize the layout of your post archive page, single post page, and search page.
- General: Customize the utility tools like Sidebar, Scroll To Top, Breadcrumb, etc.
- Site Identity: Here you can also set the site identity, like adding Site icon (favicon), Site Title, Logo, etc. (The same option you get at the settings)
- Menus: Create and assign navigation menus with essential pages for the header, footer, or sidebar.
- Widgets: Add additional features like search bars, recent posts, or banners to sidebars or footers.
- Homepage Settings: Choose whether your home page will display a static page or a blog archive page featuring the latest posts. (You can do it from WordPress Dashboard → Settings → Reading)
- Additional CSS: For advanced users, you can add custom CSS to tweak design elements further.
Once you’re happy with your changes, click Publish to make them live.
Pro Tips: A professional affiliate site should be easy to read, not overloaded with flashy elements. Keep your design clean and simple, using consistent style, colors, and font that represent your brand identity.
6.4. Install Essential Plugins:
Now that our theme is customized, it’s time to add essential plugins that give our WordPress site the functionality it needs. WordPress has thousands of plugins, but you only need a few carefully chosen ones to run a professional affiliate marketing website.
Some of the must-have functionalities for an affiliate site include:
- SEO optimization
- Affiliate link management
- Product comparison tables
- CTAs, popups, and action bars (for conversions)
- Cookie consent banner (for compliance)
- Contact forms
- Analytics and tracking
- Speed optimization
- Backups
- Security
To add these functionalities, we need to install some carefully chosen plugins. Follow these steps to install any plugin on your WordPress website.
- Go to your WordPress Dashboard → Plugins → Add New.
- Search for the plugin name in the search bar.
- Click Install Now.
- After installation, click Activate.
- Once activated, the plugin will add new functionality to your dashboard.
Must have plugins for your affiliate website:
- RioVizual: RioVizual helps you create product comparison tables, schema-ready pros & cons tables, pricing tables, data tables, and more to boost your conversion.
- RankMath: RankMath helps you to optimize your content for search engines. Using this plugin, you can add Meta titles, Meta descriptions, Keywords, XML sitemap, robots.txt, Schema Markup, and more to facilitate your SEO performance.
- PrettyLink / ThirstyAffiliates: PrettyLinks and ThirstyAffiliates are both essential tools for managing multiple affiliate programs, tracking performance, and shortening affiliate links.
- CookieYes: CookieYes helps you add Cookie Consent banners, ensuring your website complies with GDPR/CCPA and privacy laws.
- WPForms / Contact Form 7: Both WPForms and Contact Form 7 enable you to create and manage contact forms, email signup forms, and survey forms.
- Site Kit by Google: Site Kit by Google is an official plugin by Google that lets you integrate Google Search Console, Google Analytics, AdSense, and PageSpeed Insights to your WordPress Dashboard.
- WP Rocket / LiteSpeed Cache: WP Rocket and LiteSpeed Cache are performance optimization plugin that lets you speed up your site by minifying code, caching, and optimizing files.
Pro Tips: Don’t overload your site with too many plugins. Always check user reviews, ratings, and update frequency before installing one. If you’re on a tight budget, start with the free versions. You can always upgrade to premium once your website starts earning.
6.5. Create Core Pages:
Now that our essential plugins are installed, it’s time to create the core pages that every affiliate marketing website needs. These pages build trust, improve user experience, and ensure legal compliance.
Core Pages Include:
- Home Page: The front page of your site that reflects your niche, explains what you do, and helps visitors understand what they will find.
- About Page: Share your story, build trust, and explain why you’re an authority in your niche.
- Privacy Policy Page: Required by law if you collect user data (cookies, forms, analytics).
- Affiliate Disclosure Page: Required by the FTC to inform users that you earn commissions through affiliate links.
- Terms & Conditions Page: Outlines the rules and guidelines for using your site.
- Contact Page: Enables visitors, brands, or advertisers to reach you easily.
- Blog Archive Page: Displays your latest articles and helps you attract traffic through SEO.
Let’s create these pages:
- Go to your WordPress Dashboard → Pages → Add New.
- Enter the page title (e.g., About Us).
- Use the editor to add text, images, or layouts.
- Click Publish to make the page live.
Note: You will get two pages (Privacy Policy, Sample Page) by default while installing WordPress. Don’t hesitate to delete them and create a custom one you need.
Our core pages are created. We can now design it from scratch using any page builder, including the default Gutenberg Editor that comes with WordPress. You can use any page builder according to your preference.
6.6. Create Navigation Menu:
Once your core pages are created, the next step is to organize them into a navigation menu so visitors can easily find their way around your website. A well-structured navigation menu improves user experience and keeps people engaged longer.
Here’s how to create a navigation menu in WordPress:
- Go to your WordPress Dashboard → Appearance → Menus
- Set a Menu Name (for identity and reuse later) and click Create Menu.
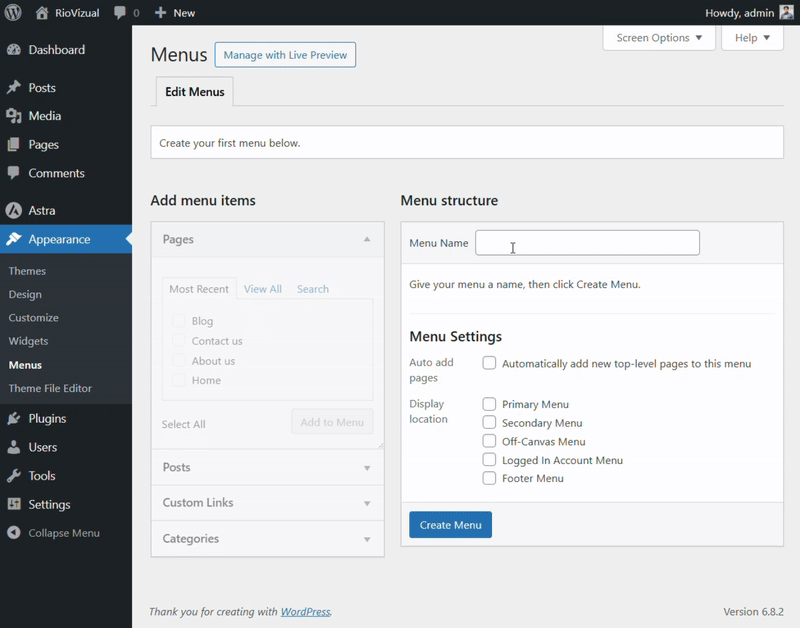
- Add essential pages (Home, About, Blog, Contact) to the menu and choose the display location.
- Click “Save Menu” to save the changes and publish.
Step 7: Create Quality Content:
In affiliate marketing, content is your investment and the ultimate business engine. Once our essential pages are ready, it’s time to create content that attracts our targeted audience and converts them into buyers.
While creating content, make sure you are familiar with SEO best practices to drive organic traffic. Google and other search engines reward websites that consistently publish high-quality, SEO-friendly content that solves user problems and fulfills the search intent.
By writing detailed, helpful, and engaging content, such as product reviews, buying guides, product comparisons, and best-of articles, you can build trust with your audience and earn a higher ranking in search engine results.
Follow these few simple steps to create Quality Content:
- Research Keywords: Begin by conducting keyword research to understand what your audience is searching for. Use tools like Ahrefs, SEMrush, or Google Keyword Planner to find both long-tail and buyer-intent keywords that are relevant to your niche.
- Understand Search Intent: Each keyword has a purpose. Some users are looking for information, while others are ready to make a purchase. Match your content type to the user’s intent for better conversions.
- Plan your Content: Build an editorial calendar that outlines topics, keywords, and content formats. This keeps your publishing consistent and ensures you cover all, including informational and commercial content.
- Write Helpful, In-depth Articles: Go beyond surface-level content and create articles that answer all possible questions, use clear structure (H2s, H3s), and provide unique insights. Your goal is to become the go-to resource in your niche.
- Use Meaningful Visuals (Images & Videos): Break up text with product images, infographics, or comparison tables. Consider adding short videos or tutorials to increase engagement and trust. Always optimize visuals for speed.
- Optimize for SEO: Optimize your content by following on-page SEO best practices, including incorporating keywords naturally in your headings, URL, and meta description; using alt text for images; and enabling schema markup for Pros and Cons using the RioVizual plugin to improve search engine visibility.
- Publish and Promote: Publish and share your content across social media, email newsletters, and niche communities. Reach out for backlinks to boost authority, and refresh older posts regularly to keep them ranking.
Pro Tips: In SEO, quality always beats quantity. Focus on publishing fewer but well-researched articles that solve real problems, add unique insights, and stay updated over time.
Step 8: Submit Your Website to the Search Engine
Once your website is live and you’ve published some quality content, the next step is to let search engines know it exists.
Submitting your site to Google (and other search engines) helps speed up indexing, improves visibility, and increases your chances of ranking in search results. Follow these steps to do this:
8.1 Update WordPress Search Settings
- Go to your WordPress Dashboard → Settings → Reading.

- Scroll down to Search Engine Visibility.
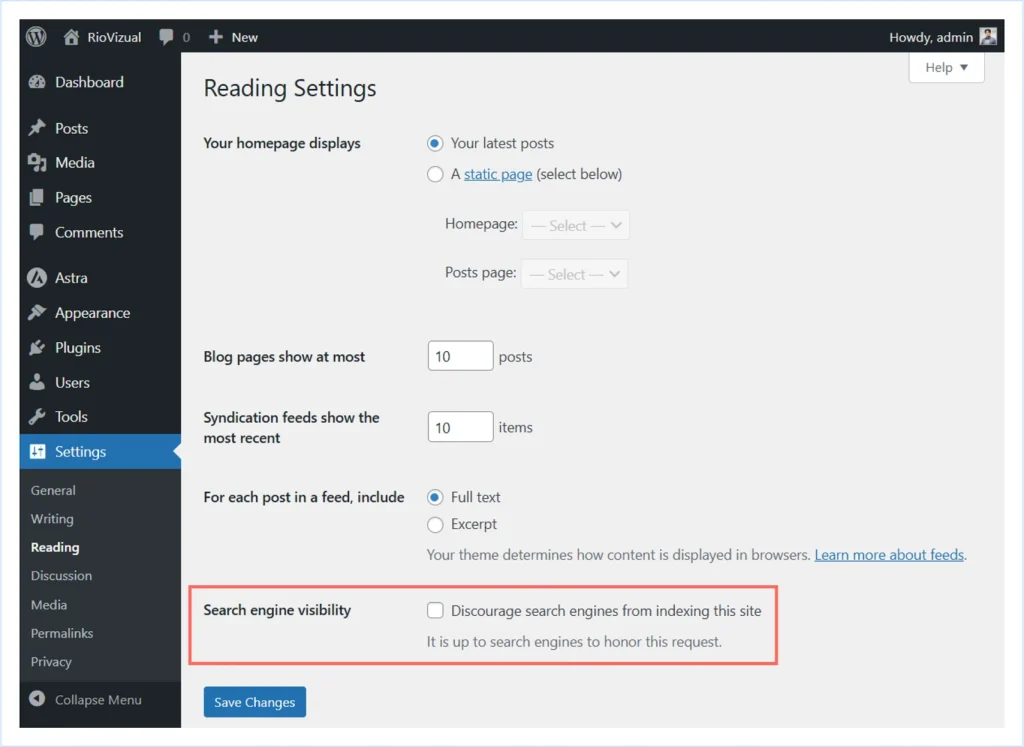
- Make sure the option “Discourage search engines from indexing this site” is Unchecked.
- Click Save changes.
It will allow search engines to crawl your site.
8.2 Connect with Google Search Console
Google Search Console (GSC) is a free tool from Google that helps you track SEO performance, monitor indexing, and detect issues.
- Go to Google Search Console.
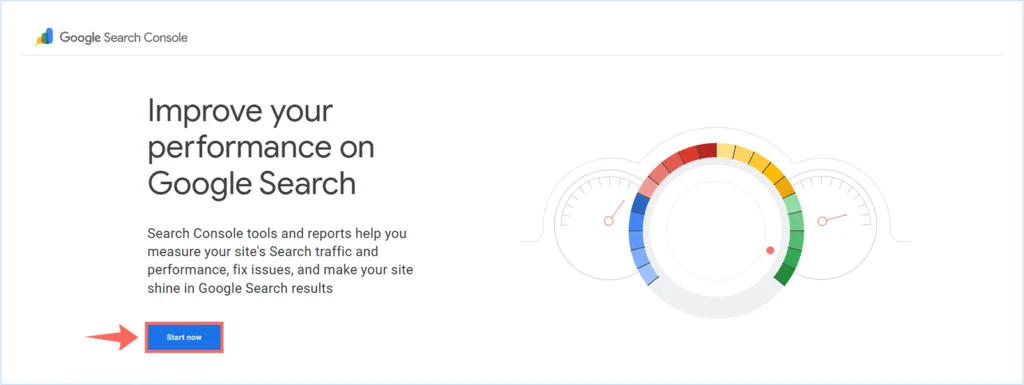
- Click Start Now and sign in with your Google account.
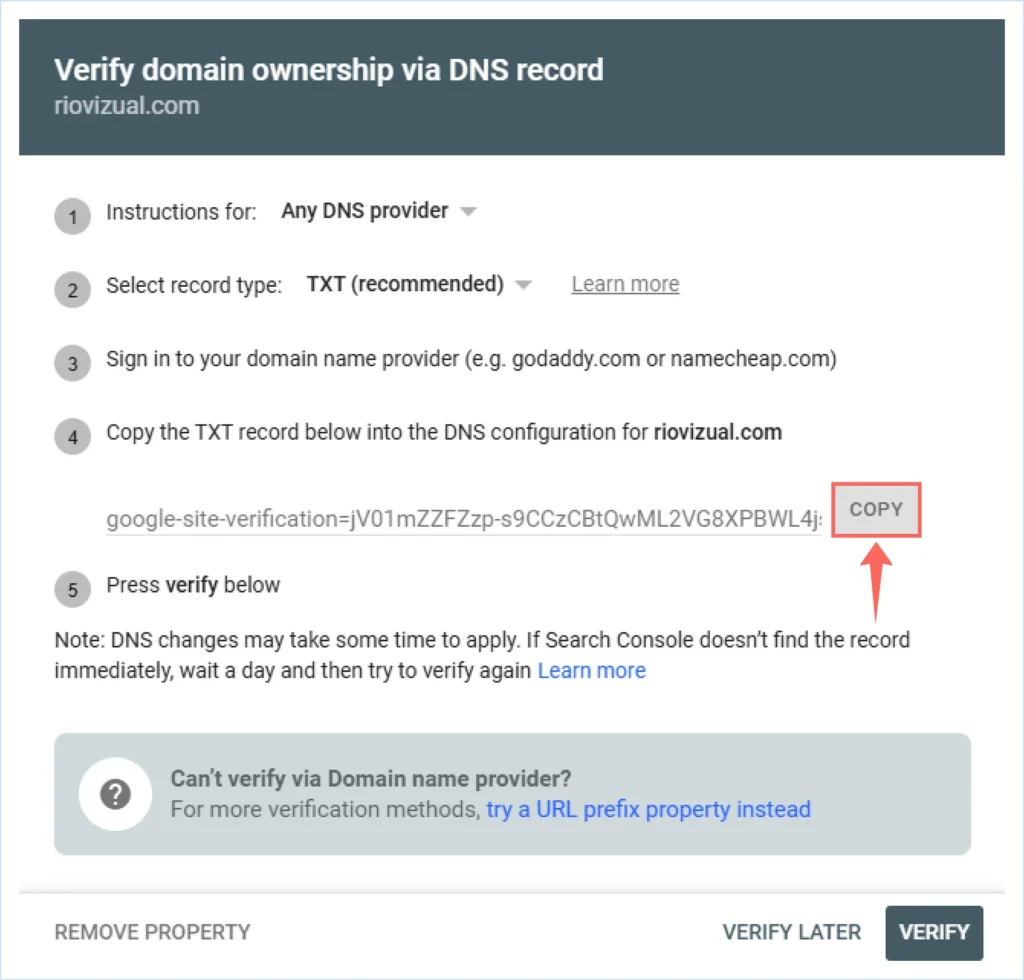
- Choose Domain Property and enter your domain name (without http:// or https://).

- Copy the TXT record for domain ownership verification.
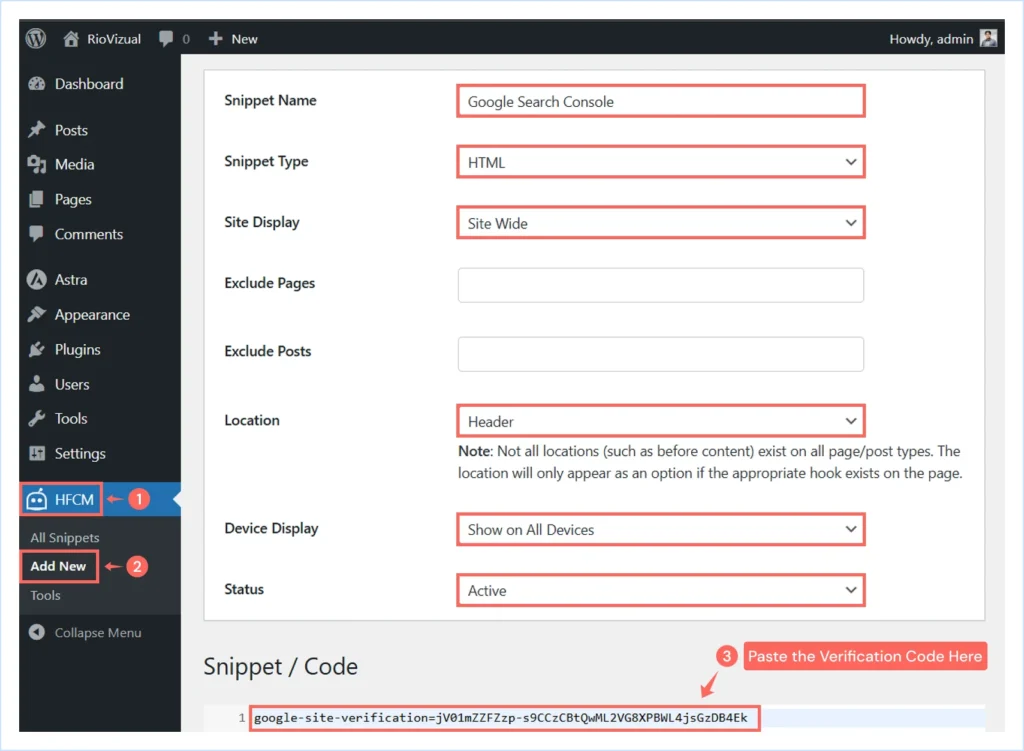
- In WordPress, install a plugin like Header Footer Code Manager or WPCode.
- Paste the TXT record you copied to the website’s Header section and save changes.
- Return to Google Search Console and click Verify.
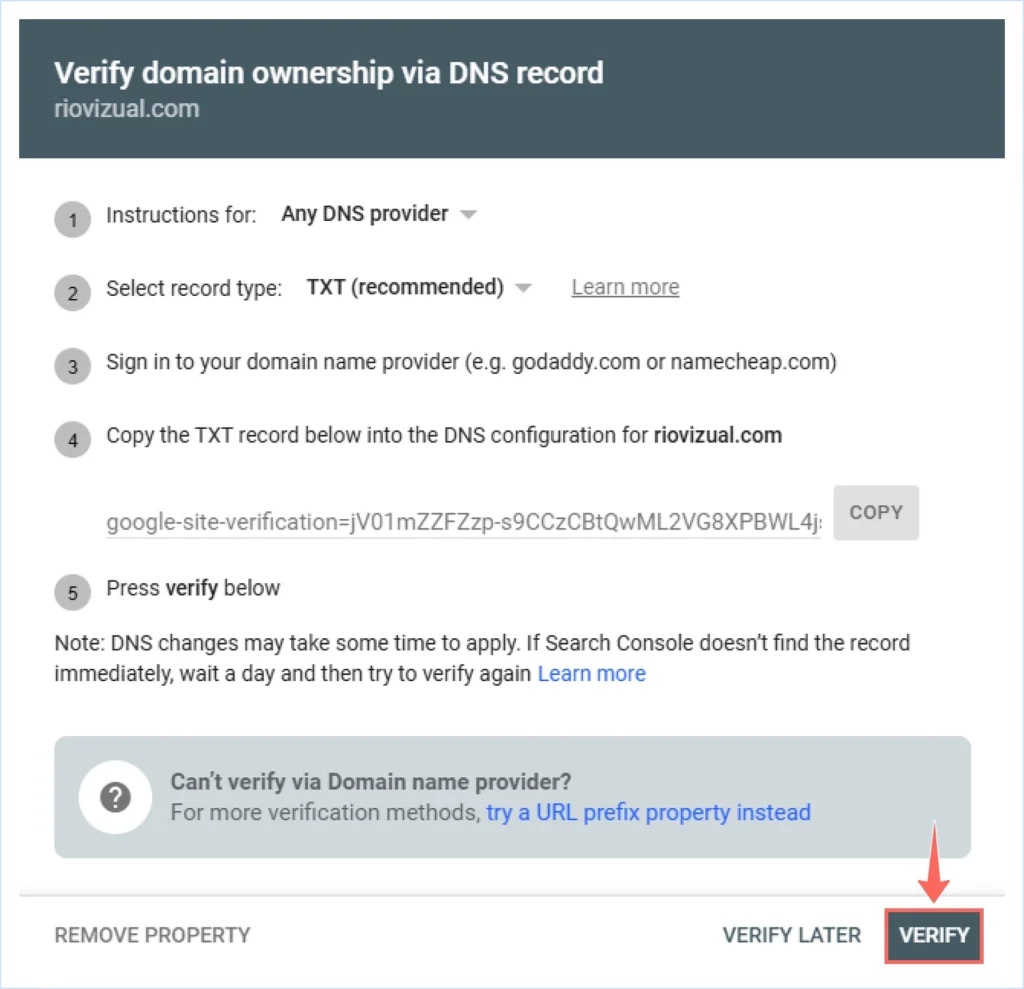
Once verified, your site will start showing essential SEO data and indexing reports in Google Search Console (GSC).
8.3 Create and Submit Your Sitemap
A sitemap helps search engines understand your site structure and crawl it more efficiently. Follow these steps to create one:
- Install and activate the Rank Math SEO plugin on your WordPress website.
- During setup, enable the sitemap option. Your sitemap will be available at: yourdomain.com/sitemap_index.xml
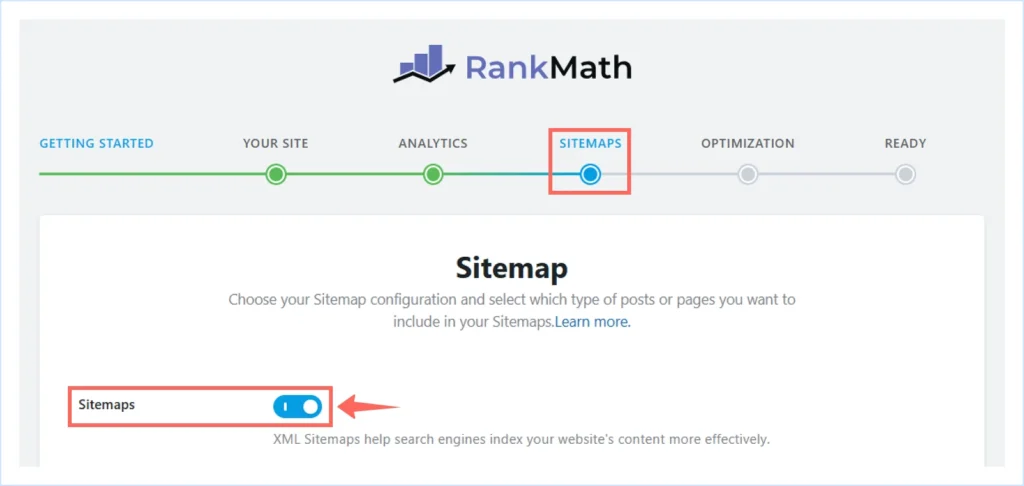
- You can also enable or manage the sitemap later from the Rank Math dashboard.
- In Google Search Console, go to Index → Sitemaps.
- Under “Add a new sitemap”, enter your sitemap URL and click Submit.
Google will now automatically crawl your site and track new content as it’s published.
Pro Tips: Don’t stop at Google; also submit your site to Bing Webmaster Tools for extra visibility on Bing and Yahoo. Regularly check Google Search Console to monitor indexing status, performance reports, and potential SEO issues.
Conclusion
Building an affiliate marketing website may feel complicated at first, but once you break it down into clear steps, the process becomes simple and achievable.
In this guide, we’ve walked you through the entire journey from choosing the right niche and website type to setting up WordPress, customizing your site, creating quality content, and submitting it to search engines.
With this roadmap in hand, you now have everything you need to launch your first affiliate website with confidence.
Remember, success in affiliate marketing doesn’t happen overnight. Stay consistent, focus on creating valuable content, and keep optimizing your site step by step. Over time, your efforts will compound into a sustainable online business.
If you have any questions or need clarification, drop a comment below. We are here to help make your journey smoother. Wishing you the very best in your affiliate marketing career.

Leave a comment